Add a personal touch to your Joomla templates with custom CSS rules
We’re quite proud of our template designs; our design team have an eye for detail and know how to craft an eye-catching yet intuitive layout that looks modern and exciting. However, that doesn’t mean that you shouldn’t be interested in adding your own custom styling to them when you want to add a personal touch to your site. Custom CSS gives you the power to make your mark on your site’s design and layout. In this article we’ll look at how you can add your own CSS rules to the template while keeping your core files safe from any mistakes made in testing, and also look at a few different methods that will allow you customize the site’s appearance (such as hiding elements on a page, changing the font size & color or background color/image etc…) or even the entire layout you are using.
What is CSS?
If you’re building a website with Joomla then you’ve got to have heard of CSS, or Cascading Style Sheets. If HTML is the paint, CSS is the brush. Sure, you can write a site in pure HTML if you’re really dedicated (or nostalgic for the simpler times of the early internet), but whatever you create is going to be a barebones structure with no style or flair. Add CSS into the mix and you can style, align, color and animate those boring old HTML elements to make something that won’t make designers cry. How does it work? Well, the brush analogy from earlier is more accurate than you may think. CSS is simply a set of rules (usually in a file separate from the HTML and often referred to as a “style sheet”) that tell the browser what to do with the HTML; should it display it as a different color? Change the size or type of font? With CSS, you can control these factors. Of course, that’s the basics; but like any toolset in the right hands it can perform some incredible tasks.
So if the “SS”, or “Style Sheets” part of “CSS” refers to the document that contains the CSS rules, what does “Cascading” mean? Essentially, this is how the browser decides which rules to apply; the more specific the rule, the more important it is. Without the “cascading” element of CSS, rules would constantly conflict and designing a layout would require even more testing and trial and error; with the ability to override rules or specify particular elements to be styled you can employ a wide range of style changes on even the largest site without major conflicts.
Adding your own CSS rules to a template
The CSS rules in our Joomla templates are contained in multiple files; the main rules are found in the template.css file, but there are also files with CSS rules specific to mobile or tablet devices (mobile.css and tablet.css), as well as standalone CSS files for specific third-party extensions. It’s a lot to keep track of, and if you go jumping into these files and make changes to see what happens you’re probably going to run into issues fairly quickly; each file has a different place in the CSS hierarchy, so finding the right CSS rules to change can be a challenge, not to mention that one mistake and your site’s design could be ruined, with no way of rolling back your changes. Even more frustrating, if you modify these core files and then need to update your template the changes will be lost, so they’ll need to be backed up before updating, then reapplied after the update; it’s a time-consuming process.
Thankfully though, our developers knew how important it is for designers or other web developers to be able to make and backup changes to the CSS easily while still allowing beginners to test changes without the risk of accidentally damaging necessary files. In all our modern Joomla templates based on the Gavern Framework there are two convenient options for adding your own rules to your site; which you decide to use will depend on your ability and the amount of changes you want to make. To get a look at these options, login to your Joomla backend and click on Extensions -> Template Manager and click on the GavickPro template you’re going to add the CSS to. This will open the Template Settings page. From here, click on the Advanced settings tab.
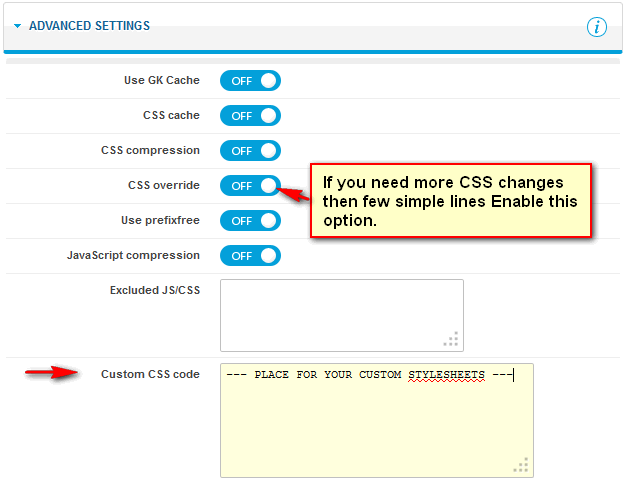
In Joomla 2.5 (Gavern Framework)
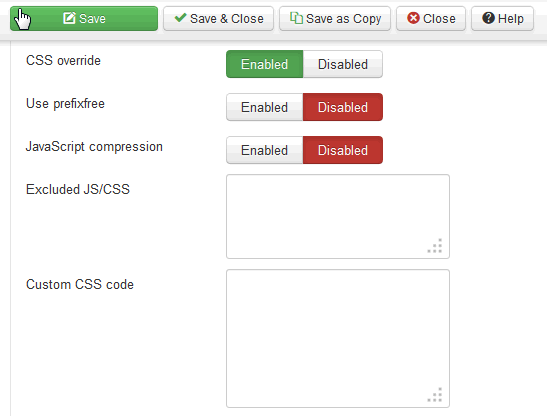
In Joomla 3 (Gavern Framework)
If you take a look at the above screenshots, the first option for modifying the CSS code should be fairly clear; both Joomla 2.5 and Joomla 3 versions of the template include a Custom CSS Code field. Any CSS code entered into this field will be automatically loaded after the other CSS stylesheets so that they will automatically have a high priority. The second option for modifying CSS code isn’t so clear, since only the first step is included in the image; the CSS Override option, when enabled, will take CSS rules entered into a special override.css file and, like the Custom CSS Code field, will apply them after the other stylesheets.
So which method is right for you? It depends on what you’re trying to achieve. Let’s have a closer look at each method to help you decide.
The Custom CSS Code Field
Using the Custom CSS Code field in the Advanced Settings of the template is easy as pie; all you need to do is enter your new CSS rules into the Custom CSS Code field, and save your changes. Now, your newly-entered rules will be automatically applied with no further action needed from you. it’s a convenient, hassle-free method, but there’s one issue; it’s not very convenient if you’re applying large amounts of changes. It’s a small field, and though you can add as many CSS rules as you like there, if you come back later and want to make changes it will not be very easy to search through the code, unlike the override.css file method which will let you use your usual CSS editor.
Essentially, we recommend that you use this method when you are a beginner looking for an easy way to apply CSS rules and test if they’re effective, or if you have only a few minor changes to make to get the desired effect. For example, some users are happy with the default layout of the template, but they don’t want a particular element like a “Leave a Comment!” heading to appear; in this case since only a single CSS rule is needed it’s easier to add it to the template settings. As another bonus, the CSS rules added in this field are treated the same as the other settings, which means that they are saved in a separate JSON file for easy backing up and restoring; great for when you’re moving between installations or updating the template.
The Override.css File
The second method is more complex to use; first, the CSS Override option in the template’s Advanced Settings must be enabled; this tells the template to take the override.css file’s rules into account when loading the CSS stylesheets. Next, you’ll need to add your new CSS rules to the override file; since the file is stored in the template’s folder on your server you’ll need to use your FTP program of choice to get access. Connect to your server, and navigate to the templates/gk_templatename/css folder in your Joomla installation; in this folder are all the CSS files used by the template and the override.css file. Download this file to your local machine, open it with your preferred editor and make your changes. Once all your new CSS rules are added, save the changes and upload the modified file back to its original location and you’re new rules will be applied.
As you can see, this method does have a lot more steps to it than just using the Custom CSS Field. However, if you’re an experienced designer looking to make a lot of changes to the core CSS, then using the override.css file is the more logical option; you get a standard CSS file that you can manipulate and add to just like any other file, so it’s great for applying wide-ranging or complex CSS rules. Also, the override.css file can be backed up separately so you can use it on multiple Joomla installations or just keep it safe during updates.
Note: Using the override option or override.css file will override CSS styles on all subpages. If you want to use new styles on only a select few areas or modules you’ll have to use the different methods discussed in our separate documentation; class suffix method or module method.
How to find which lines I have to change/override?
Now you’ve got a method for adding your own CSS rules, but how do you know where the rules need to be targeted? Most websites are quite complex beasts, with blocks within blocks and many different elements each with their own CSS rules; how can you drill down to find out exactly what rules you need to be overriding to get your desired effects? What you need to do is learn how to identify the ID or class of an element; once you know this, you can accurately target your rules to that identifier. You have a few popular options for getting this done:
- If you’re using Google Chrome then you already have the tools ready to go. Simply right-click on the area you want to target with your CSS and click Inspect Element in the context menu to bring up the source of the page, where you can find out all the necessary information for targeting your new rules. As an aside, you can also change the CSS code live in the panel; these changes naturally won’t be saved, but it’s a simple way to see the effects of your CSS changes before you go to the trouble of applying them in the options. Be sure to use the proper format when adding your CSS by referring only to existing selectors and classes.
- If you’re using another browser such as Firefox it’s worth looking into the Firebug tool, that will help you when inspecting HTML elements and CSS properties (you can see how it works online on YouTube). If you try to set a style rule for something that doesn’t exist in the template’s style, you will not see any changes, so make sure you’ve got the ID or Class name down exactly before making changes; it will save you some frustration later! If you want to read more about this topic you can find out more in our simple CSS changes article.
Custom CSS and Joomla template updates
One of the problems with making changes to the template files is that when you upgrade these files will be replaced, causing you to lose any custom code that you’ll need to reapply. However, since the Gavern Framework’s override options provide ways to keep your changes together, you can easily overcome this hurdle. When upgrading your template, any code added to the Custom CSS Code field of the template’s advanced settings will not be lost, so you can simply run the upgrade as normal without any further action. However, if you’ve added code to the override.css file instead then the file will be overwritten during the upgrade process and your changes lost. For this reason you must BACKUP THE override.css FILE BEFORE UPGRADING THE TEMPLATE. Also bear in mind that if you’ve made any other changes to template files then you will need to backup the modified files before upgrading too, so that you can add them back once the upgrade process is complete.
When won’t these CSS override methods work?
Sometimes, you may find that even after adding your custom CSS code to the appropriate field in the settings or the override.css file you can’t actually see the changes on your frontend. Typically, there are several different possible reasons for this, but there are a few fixes that will help you get things running again in most cases:
Clean the Cache & Disable CSS compression
The first step you should look at applying is cleaning your browser’s cache. Your internet browser’s (Firefox, Chrome, IE and Safari) cache stores information from the various sites you visit, like images, CSS and cookies so that if you visit the site again the existing data can be pulled from memory rather than redownloaded. It makes for a useful feature if you’re just browsing, but for web developers it’s highly frustrating, since sometimes changes they’ve made in the code will not be displayed because the browser is loading the older files instead of downloading the updated versions. By clearing your cache you force the browser to redownload the files, including any changes that have been made since the last time the files were downloaded.
Next, turn off GK Cache / CSS compression or Cache in your Joomla! backend while making changes, then clean your CMS cache once finished.
- In Joomla 2.5 navigate to the Site tab, select Maintenance and select all groups that have cache that can be cleared. Then, click the Delete icon in the top right menu and check again.
- In Joomla 3 navigate to the System tab, select Clear Cache and select all groups that have cache that can be cleared. Then, click the (x) Delete icon in the top right menu.
There are Joomla! extensions available to automate clearing the cache if you’re not a fan of doing things manually – a popular free extension for this purpose is Cache Cleaner.
Misspelling or other mistakes in code
If you’re still encountering issues after sorting out the cache, then the next most likely explanation is that there’s been a mistake made somewhere in the new CSS code. One of the struggles with CSS (and coding in general) is that it is very literal, and even the smallest mistake such as a missing bracket in the code can break things! Use Firebug or Chrome’s dev tools to double-check the names of the classes or IDs you’re modifying again to ensure that the identifiers your CSS rules use are accurate, and double-check your code to make sure you’ve not missed any important elements (a dedicated CSS editor is of great help here, since they will often detect issues and warn you of them in advance).
Who has the last word?
In some rare cases you might find that even after clearing the cache and checking the code you’re still not able to see your changes applied. In this case, it may be that you will need to make use of an “!important” declaration. This is a powerful command in CSS that tells the browser to give the rule with this declaration attached the highest priority possible so that it will be applied no matter where the rule appears in the CSS hierarchy. Basically, it’s a rule that ignores the “Cascading” part of CSS and just tells the browser to apply that rule regardless. It’s not best practice, but it works, so if you wanted to make sure that a property is always applied, you should add the !important property to the tag.
H1 { color: green !important; }
It’s a good idea not to make a habit of this though, as you might end up with a lot of conflicts that can damage your site aesthetics. Using lots of !important styles will make maintenance a bit harder, because you break the natural cascading in your stylesheets. You can read up some more on the “important” rule here and here.
This article was first published
