Introduction
GK Stora is dedicated Joomla shopping cart template to build your online store for fashion, bags, shoes, beauty store, sport and more with creative and modern design. The eCommerce Joomla template fully supports 2 popular eCommerce Joomla extensions: J2Store and Virtuemart.
Installing Stora Template
Before starting your installation, the most important step is to decide whether you can install Quickstart package, which will automate the installation of the latest version of Joomla!, the template, modules, menus, demo content and database data to match the demo layout of the template, or if you should use the more time-consuming manual installation, which will allow you to update an existing website without removing any content. Which method you should use rests on the current status of your site; if you're starting a brand new website or your existing site is relatively new with little custom content, then the quickstart installation will get you up and running fast. However, since it is a full Joomla! installation this method may only be used on a clean server; it cannot be installed in an existing Joomla! installation.
If you have a mature site that has a lot of content that you'd rather not migrate to a new installation, or if there is custom content that cannot be backed up and restored, then the manual installation would be the preferred install solution. This method will allow you to keep the existing content, but develop the layout and features included with the Box template to frame them in a new and exciting way. This can be especially useful if you already have an extensive product catalogue in Virtuemart, for example. With the included modules you can simply assign your existing products to the frontpage product showcases. However, the major drawback of this installation method is that it is time-consuming; without an automated install it becomes necessary to manually place and configure each of the module used in the template in order to match the demo, though of course this does allow you to modify the content as you go rather than changing the demo content after install.
Generally we recommend the quickstart installation if possible, especially if you're fairly new to Joomla. Though configuring modules is not a particularly tough task, if you are not comfortable with the process then there will be a lot of double-checking needed to ensure you are getting the settings correct. Once you have decided on your preferred method, you can move on to the following sections which will provide you with step-by-step information on how to get things installed and ready to go.
Quickstart Installation
Installing the quickstart is a fast and easy process that runs just like a normal Joomla! installation, so you won't need much time for this save for the initial transferring of the files to your server. There are however some things you'll need to have handy during the install; first up is FTP access to your server so that you can upload the quickstart files, and then for the actual install you'll also need a database name, username and password. A full step-by-step guide to this process with further information on the server requirements may be found in our documentation:
Manual Installation
Manually installing the template is a simple process, but the configuration of the template settings and the placing of the modules is more time-consuming. However, though the manual install process requires many more steps that the quickstart install, it is still easy to do; Joomla's functionality makes placing and configuring modules, plugins and extra elements such as menus very intuitive once you get the hang of it. We can break down the complete process of installing the template and configuring it to match the demo layout into several steps, some more in-depth than others:
- Download and install the template.
- Download and install additional modules and plugins.
- Import template settings.
- Upload demo images (optional).
- Place and configure modules and create page content.
- Setup menus and additional pages.
We'll look at each of these steps more closely in the following sections; once done, you'll have a nice layout that matches the demo example, ready for your own content.
Preparing Your Site for Manual Install
Before getting started you'll need to take care of one minor requirement; to make sure that the layout matches the demo you should first deactivate any existing modules in your Joomla! backend, as the install process for Box will include placing and configuring several modules that make up the frontpage as well as additional content, and if the existing modules are not deactivated there may be some conflict or overlap with the Box-specific module positions that will cause visual or other usability issues. Once the installation is complete you can of course reactivate the pre-existing modules; just be sure to double-check that they do not affect the template's aesthetic or you may need to perform some additional CSS styling to blend them effectively.
Deactivating modules takes just a couple of very simple steps; just log-in to your Joomla! backend then click on Extensions → Module Manager in the top menu. You will now see a list of active modules.
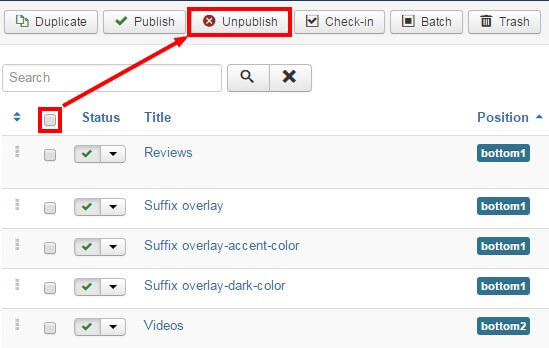
To deactivate all modules at once, click on the tickbox at the top of the second column in the module list to select every module, then click on the Unpublish button at the top of the screen to deactivate. Once done, do the same for any other pages should there be more modules. The existing modules are now deactivated and you can start with the template install.
Download and Install the Template
Now that you're ready to install, the first thing to do is download and install the template's zip package. Click on the following link to go to the GK Stora Download Page (you must be logged-in to do so!). You'll see that there are three different files available:
- GK Stora Template - This package contains the basic template files; you should download this package for manual installation.
- GK Stora Quickstart - This contains the quickstart files for a new installation of Joomla that matches the demo layout exactly; this can be ignored if you are installing manually.
- Modules and Plugins
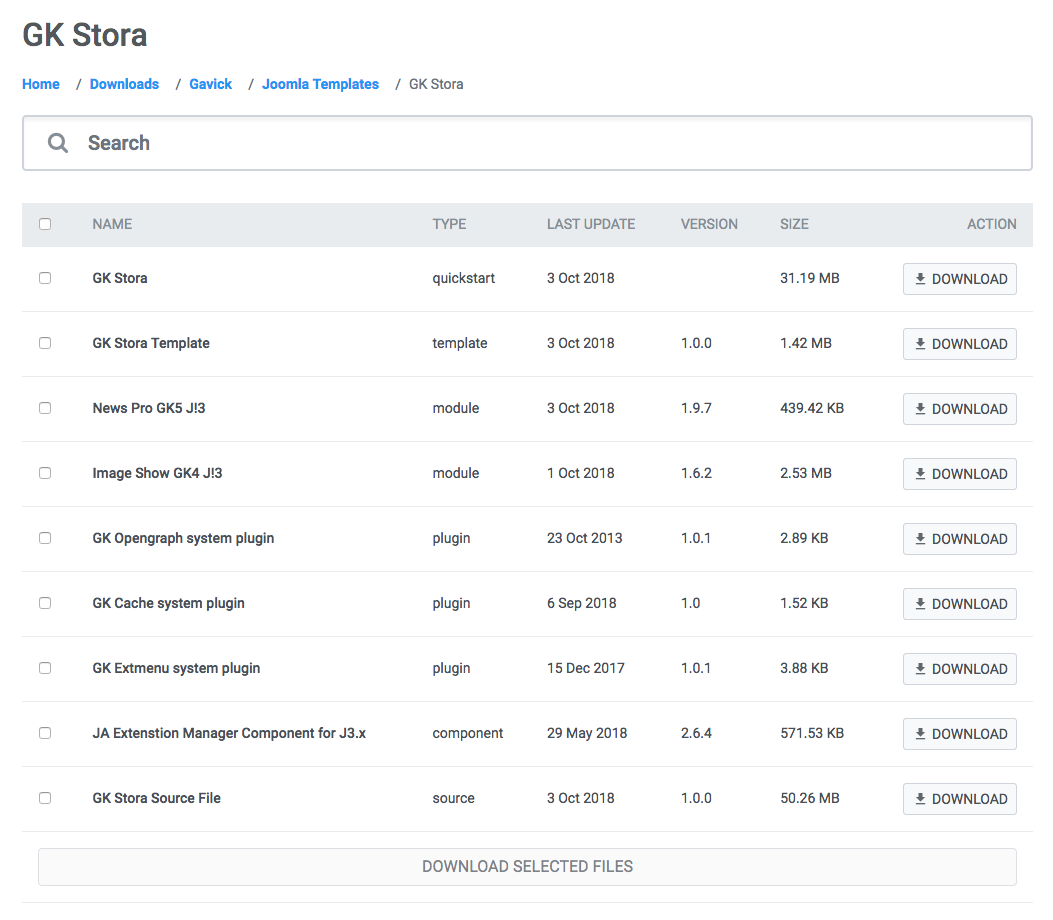
Grab the basic template package and the rest files package; both will be needed during this install. You might also want to download the quickstart package if you want to use the demo images as placeholders before you add your own content; we'll discuss how to do this later. Once downloaded, we can install the template package:
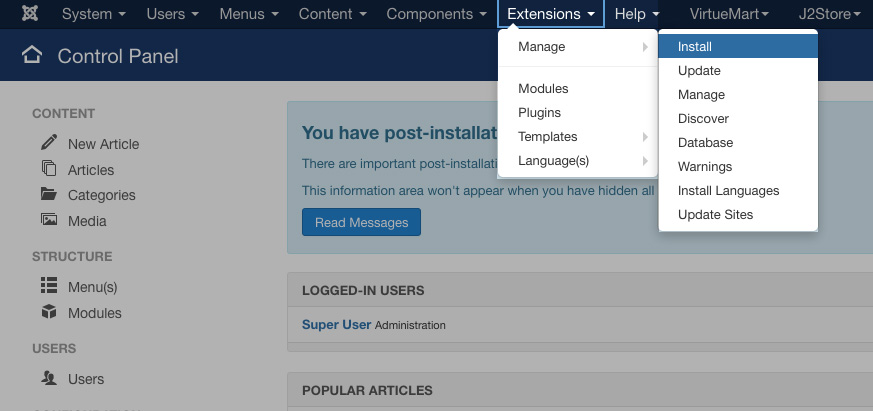
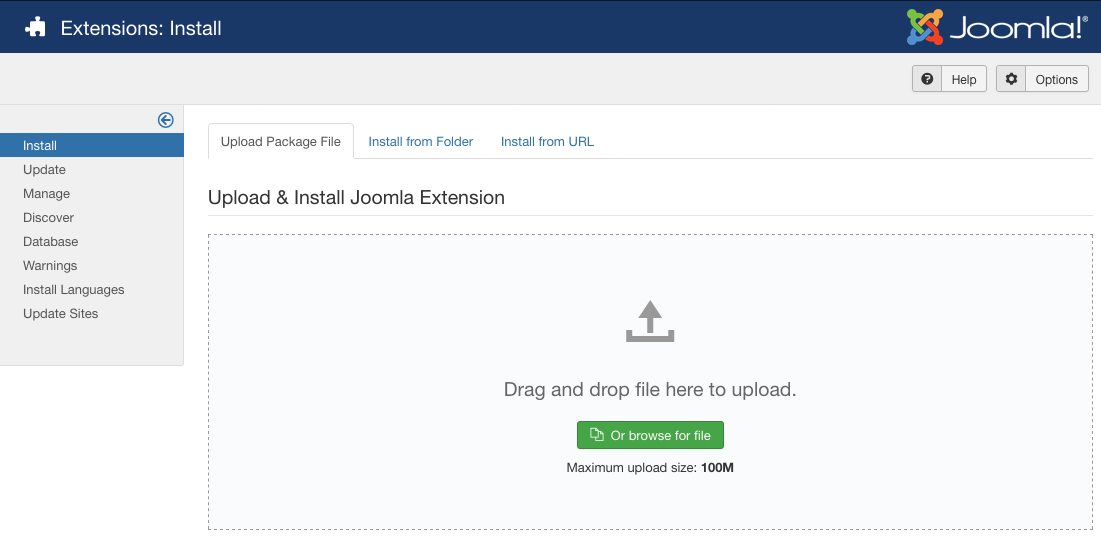
- Login to your Joomla! backend and click on Extensions → Extension Manager, the manager's screen will open; now click on the Upload Package File tab at the top of the screen.
- Click on Choose File to open your file browser; select the recently-downloaded file, then click the Upload & Install button.
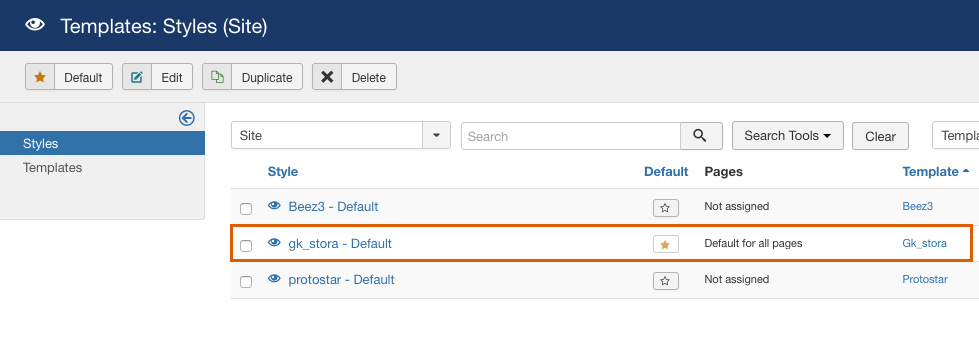
- Once installation is complete, click on Extensions → Template Manager to open the list of available templates; you should now see gk_stora in the list.
- Click on the star next to gk_stora in the Default column to set it as the default template.


The template is now installed and ready to go; next we need to take care of the plugins and modules.
Installing extensions: modules and plugins
GK Store supports multiple extensions to help build specific functions and content. Check the supported extensions list below:
- News Pro GK5 J!3
- Image Show GK4 J!3 module
- GK Opengraph system plugin
- GK Cache system plugin
- GK Extmenu system plugin
- JA Extenstion Manager Component for J3.x
All the extensions are included in the GK Stora download page. You can download all extensions and install one by one.
Installing Virtuemart
Virtuemart is a mature, complete ecommerce solution for Joomla!, offering the full range of product management, pricing, sales and payment options that a modern shopping website needs to give a comfortable purchasing experience to their customers. To install it, visit the VirtueMart Download Page and click on the Download VM3 Now button; this will download a file called com_virtuemart.3.x.x_extract_first.zip. This package contains the core installation files required for an existing Joomla! site, so you can ignore the other downloads.
Once the file is downloaded, extract it locally as the individual components will need to be installed one by one. Once extracted you will be left with three separate zip files. Now log-in to your Joomla! administrator area and click on Extensions → Extension Manager in the top menu to open the Extension Manager: Install page. Click on the Upload Package File tab and then click the Choose File button to open the file explorer. Select the file you wish to install, then click on the Upload & Install button to install the package. The three files should be installed in the following order:
- com_virtuemart.3.x.x.zip - This is the core VirtueMart extension, and should be installed first.
- com_virtuemart.3.x.x_ext_aio.zip - This package contains the VirtueMart-specific modules and other components, and should be installed second.
- com_tcpdf_1.x.x.zip - This package contains the component needed to create PDF invoices that can be emailed or printed for your customers, and should be installed last. If you are an advanced user who does not require PDF invoices or if you have alternative invoicing methods ready then you can ignore this package, but all other users or those who are not sure of their requirements should install it as standard.
Once all of the packages have been installed in order VirtueMart will be ready to use, but there is one very important change that needs to be made in the VirtueMart configuration. Click on VirtueMart → Configuration in the Joomla! main menu to open the configuration screen for VirtueMart. There are a lot of options here, but we only need to change one for now; click on the Templates tab and, in the Activate CSS Styles & Javascripts section, disable the Using the VirtueMart CSS option and save changes. If you do not do this, then the template CSS will be overidden and will not match the demo.
Installing J2Store
J2Store is one of the best free Joomla Shopping cart & eCommerce extension with more than 100+ features: Product management, sale report, tax, shipping method, coupons, vouchers, order notification email templates, invoice templates, additional field types for product options and more.
Installation steps:
- Download J2Store from J2Store Download Page and download latest version of J2Store.
- Install the component: Go to Extensions > Manage > Install, browse the J2Store installation file and install.
Importing Template Settings
The template settings cover a wide range of options, including layouts, fonts, and other special features that allow users to add their own touch to their website. By importing settings, you can achieve the recommended style based on our demo example without manually configuring each setting.
To import these settings, we first need to get the json file that stores them; this may be found at this download link.
If you just click on the link you'll probably run into a little issue; instead of downloading the file your browser will instead try to open and display the file contents in the viewport. It won't break anything, but you don't want to waste time copying and pasting the data into a new file, right? So to get around this, we'll need to tell the browser that we want to download, rather than display the file. The process is essentially the same for every browser, but for some reason each of them decide to name the command you need to use differently:
- In Safari - Right or control-click on the link and select ‘Download linked file’. This will download a file called Stora_config.json.
- In Chrome - Right-click on the link and select ‘Download link as…’. A dialogue box will open to specify where the download should be saved. The name will default to Stora_config.json, so just leave this as default and save the file.
- In Firefox - Right-click on the link and select ‘Save link as…’. A dialogue box will open where you can specify the save location; as with the other browsers the name will default to Stora_config.json so leave this as it is.
- In Internet Explorer - Right-click on the link and choose 'Save Target as'. A dialogue box will open so you can decide where to download the file to. The file name will default to Stora_config.json, so leave this as it is.
Once downloaded, you need to import the settings into your Joomla installation. Connect to your server via FTP and navigate to the templates → gk_box → config folder; here is where the json configuration files are stored. Upload your recently-downloaded Stora_config.json to this folder so that it can be found by Joomla. Now you can close your FTP program and login to your Joomla! backend as normal.
Click on Extensions → Template Manager to open the list of installed templates, and find the gk_box template in the list; click on it to open the template options panel. At the top of the screen is a set of tabs for each section of the settings. Open the Basic Settings tab; you'll notice that there is a Load configuration setting as the top option. At this point you'll only have the default.json configuration loaded, but if you click on the drop-down list under Load configuration you'll see the Box_config.json file you uploaded before select this from the list and then click on Load to apply the settings from the file.
Assigning the Frontpage ID
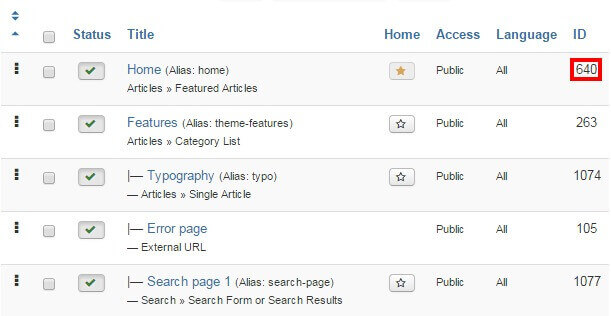
By default they certain page IDs will be assigned as the frontpage and additional pages; this controls which CSS rules are applied. However, depending on your configuration it is likely that your frontpage will have a different ID to that which is automatically stored in the imported settings. As such, we will also need to specify the frontpage ID. To do so, click on Menus → Main Menu in the top menu of your Joomla backend to see a list of assigned menu items. Make a note of the ID for your Home menu item; this number is located in the last column of attributes as in the screenshot below:
Click on Extensions → Template Manager → gk_box → Features tab to see the list of special features options included in the Box template. We're interested in the Suffixes for pages option at the bottom. In the ItemID/Option field, enter the ID number for your Home menu item, then in the Suffix field, type frontpage, then click the Add Rule button.
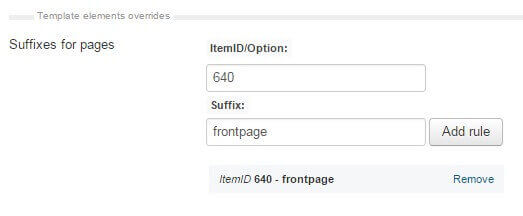
The frontpage suffix will be added to your Homepage, and the correct CSS rules will be applied. Now repeat this process twice to add two more CSS suffixes to the frontpage; nav-transparent and frontpage-grid.
As the Box template's frontpage also uses the sidebar to place several modules in, we must also make a change in the frontpage's sidebar width. To do this, click on the Layouts tab; the second to last option in this section is Custom Sidebar Width. In the ItemID/Option field, enter your frontpage ID. Next, in the Width field, set this to 50% and click the Add Rule button. The sidebar is now set to the correct width.
Now we can start creating the content for the site; at this point you may choose to upload the placeholder demo images if you do not have any of your own ready on your site, or jump straight to installing the modules for the frontpage.
Upload the Demo Images (Optional)
The modules that we will setup in this tutorial will include references to images that are part of the demo content in the quickstart package, but are not included in the base template package that is used for manual install. This means that any image references will not be accurate, and the frontpage and other areas may not display properly until you assign your own images to each section, which you can do as we create each module.
However, if you haven't prepared your own frontpage images yet then you might want to consider uploading the demo images; this way you can just follow the basic module setup and any images referenced in the modules will be available, so you can see the layout on your site and replace the images with your own later. Uploading the demo images is very easy; we can simply take the folder from the quickstart package and upload it to our site via FTP.
The module placement guide assumes that you have uploaded the demo images to your server in certain situations, such as when images are defined in the HTML code; if you have your own images, simply replace the src attribute accordingly as you reach each section of the guide.
To upload the folder, firs you'll need to get the quickstart package from the Stora download page and download the quickstart package: GK Stora. Once the download finishes, then extract the package on your local machine.
When the extraction is complete open the extracted quickstart folder; inside you'll find an Images folder, and inside that will be a Demo folder; this contains the demo-specific images for Box. Connect to your server using the FTP program of your choice and upload the Demo folder to the Images folder of your Joomla installation (this is in the root of your Joomla install).
With this folder uploaded the references included in the custom HTML of the frontpage modules (such as the advertisement banners) will point to the demo images as placeholders until you're ready to add your own content.
Module Placement
The frontpage of the Box template is based on modules; from simple custom HTML modules to more complex modules such as our News Show Pro showcase module, that can be used to display articles or VirtueMart products in portal modes specially-designed for Box. If you're going to build a site that looks every bit as good as the demo layout then it's very important that the modules are assigned and configured correctly to ensure that your site gives the perfect first impression. In each module you will find some standard options that appear in every module regardless of type, and module-specific options that control the finer details.
The basic steps for placing a module are:
- Login to your Joomla! backend and click on Extensions → Module Manager in the top menu to open the Module Manager, where you can see a list of modules currently assigned to your site (as per our preparation any existing modules in your installation should be disabled, indicated by a red X under the Status column, or deleted if unnecessary to avoid confusion).
- Click on New at the top of the screen to open a list of available Module Types.
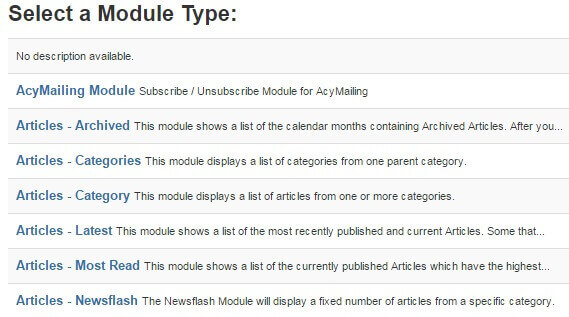
- Select the required Module Type from the list; you will be taken to the settings screen for the module.
- In the Module tab (the first options tab you see when creating a new module of any type), add a title to the Title field; this is required before the module can be saved.
- Set the Show Title option to Show or Hide, depending on the required module settings; some modules use the title text, while others will not.
- In the Position field, set the module position. This tells Joomla where the module should be displayed on your site. You may either select the required position from the drop-down list, or manually type the (case-sensitive) module position into the position field.
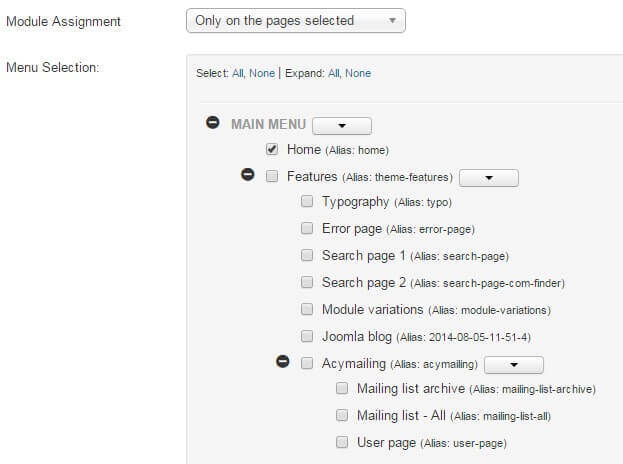
- Open the Menu Assignment tab. Here, there is a Module Assignment drop-down list where you can define on what pages/menu items a module should appear on. In Box there are two settings used here; either the module is left at the default On All Pages, so it will appear everywhere on your site (such as with the bottom menu) or the option is set to Only on the pages selected. When this option is set, a list of available pages/menu items will appear, and you can add a checkmark next to the relevant item. Usually, this option is used to display a module on the frontpage only.
- Configure the module-specific settings. Each module will have its unique settings, some more than others. For example, our robust News Show Pro module has multiple tabs of options, whereas a Custom HTML module will just have a space for adding HTML content.
- Save changes to place the module.
These basic steps will be the same for every module placement; it's a good idea to familiarize yourself with this process if you are new to Joomla!, as it is one of the best ways to make your site your own.
Now let's configure the modules for our frontpage.
Frontpage Modules
The frontpage modules provide the core functionality that your frontpage offers, with product showcases, tabbed slides and carefully crafted image and text blocks that will help you build you company brand and maximize sales, so it's important that they are configured correctly. We will cover each module position of the frontpage in turn until the frontpage layout is complete.
Before starting module placement it is advisable that you disable the TinyMCE or other WYSIWYG editors. This is because these editors automatically cleans up empty HTML tags, but sometimes the modules used in our templates include custom HTML modules that use blank tags to create icons or for additional CSS purposes, so these empty tags shouldn't be removed. Since the clean-up cannot be disabled it is instead necessary to disable the editors.
In order to disable the WYSIWYG editor:
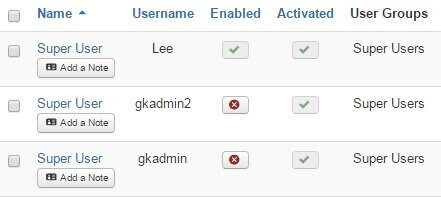
- Click on Users → User Manager in the top menu of your Joomla backend to be taken to a list of your registered users.
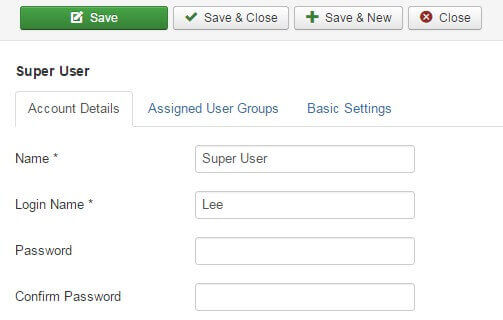
- Click on the username you will be logged in as when placing the modules to be taken to the Edit Profile screen.
- Click on the Basic Settings tab and change the Editor option from Use Default to Editor - None.
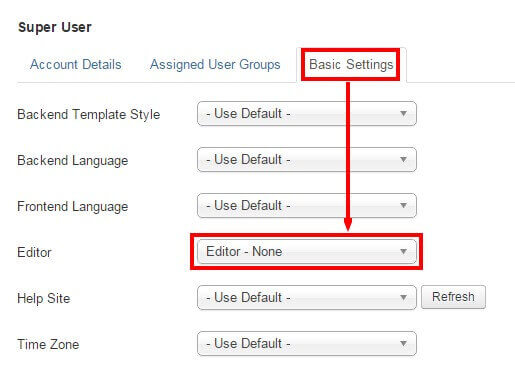
- Click on Save & Close at the top of the screen to save changes.
Now when you open the editor in an article or Custom HTML module you will see just the plain text editor, and empty tags will not be automatically removed. Once you have finished module placement you may wish to reactivate the editor for the user should you intend to use it to write articles.
Though each type of module will offer a range of differing options, there are two basic but important options tabs to be found in every module; Module and Menu Assignment, which offer four core options; title, show/hide title, position, and menu assignment. The basic options for each frontpage module will be provided at the beginning of each module's relevant section, with the more complex module-specific settings following.
Each module covered in this section will include the following information:
- Module Desciption - A short description of the the module and how it is used on the frontpage, along with a link to a screenshot of the complete module settings should you prefer to match the configuration by sight rather than by following the guide. Note that in the case of custom HTML modules the HTML code that needs to be added to the module will be included in the Main Configuration section described below.
- Basic Settings - Provides the basic configuration details, including the module type that should be selected from the list of available modules when creating a new module, and the title, show/hide title, position and menu assignment settings as used in the demo.
- Main Configuration - Covers the module-specific settings, such as configuring the News Show Pro layouts, or providing the code to be added to a Custom HTML module.
With these sections you will be able to accurately match the demo layout. Now on to the modules!
Working in progress.
Menus Settings
Working in progress.