Introduction
Equipped with a modern, professional design and support for WooCommerce, Box is a superb package for users looking to expand their sales network online while maintaining a unique brand image that stands out from the crowd. A clean frontpage with multiple image and text sections draws the eye, while large fonts and buttons provide a strong call-to-action that's just as effective for touchscreens, that mobile and tablet users will be sure to appreciate. In this guide we'll cover installation of the theme, either via the automatic installation of the quickstart package, or manual installation in an existing WordPress installation so that your site will match the layout of our demo site.

Theme Structure
The Box frontpage is created using our page-based system; rather than each section being created using widgets, instead a base page is created that uses a special frontpage template. Each subpage added to this base page will have a different function, creating the core elements of the frontpage; for example, the frontpage header's content is taken from the base Frontpage, with the Featured Image providing the background image and the HTML content of the page providing the text and button overlay. For some subpages there will also be a sub-subpages used, such as with the frontpage slideshow. Here, a subpage creates the slideshow, and the subpages of the slideshow subpage create the individual slides. Though this may seem complex at first, once you've seen it in action you'll appreciate its simplicity, and thanks to this layout you'll be able to get a site that matches the demo perfectly in minutes, even on a pre-existing WordPress installation!
Installing the Box Template
The big question before you get started with your installation is whether you can use the Quickstart package to install the complete WordPress and theme package to match the demo, or if you'll need to install the theme manually in an existing WordPress instance, which will require a couple of additional steps compared to the quickstart.
Which installation method you should use depends on whether your site is already established, or if you're starting afresh. The Quickstart is a full installation of WordPress that installs WordPress itself, the theme, plugins, demo content and database data to match our demo layout. However, as this is a full WordPress installation it may only be used on a clean server; the package cannot be installed on an existing WordPress instance.
Manual installation is still very simple as WordPress includes the ability to import much of the content from the demo, and the page-based frontpage layout means that you can match the demo exactly in just a few steps. However, there are a few extra steps needed to set the frontpage template and configure the menus and additional widgets if you want to get your site looking exactly like our demo layout. If you've got a lot of content that will take you a long time to backup, or if backing up and restoring your content is not an option, then the manual installation is a great way to get an updated site without losing all your data.
Generally we recommend the quickstart installation whenever possible; this install method provides you with the exact settings and layout needed to match the demo so you can start customizing your site right away. You should use this method if you are starting a new website, or if your existing website/WordPress installation lacks any unique content you wish to preserve. For example, if your host installed WordPress for you, then it's advisable to remove this installation and reinstall using the quickstart, as it is much faster than manual installation.
If you have a lot of existing posts or other content that you do not wish to lose then the manual installation is the only way to install the theme and match the demo layout without losing this content. However, with manual installation you will be able to take care of some customization as you go; modifying shortcodes or widget settings to match your own content rather than the imported demo content.
Both installation methods will be covered in the following sections, with step-by-step guides to getting everything up and running.
Quickstart Installation
The quickstart installation requires very little input save for your admin and database details, and once the quickstart is uploaded to your server the entire install process takes just a few minutes. In order to complete this install method you will need FTP access to your server and a database name, username and password. A complete step-by-step guide with further information on the requirements may be found in our documentation:
Manual Installation
Manual installation requires that the theme and plugins are manually installed, then the demo content imported and frontpage template set; finally, additional elements such as menus and widgets need to be placed and configured according to our demo settings. Many of these steps are fairly automated, so a manual installation won't take much longer than the standard quickstart install, but there's still a couple more steps than if you were to use the quickstart.
Broadly-speaking, manual installation can be split into these steps:
- Download and install the theme.
- Download and install plugins.
- Import theme demo content.
- Assign Static Frontpage.
- Place and configure widgets.
- Setup menus and additional pages.
Let's look more closely at each step in turn; once done, you will have a nice layout that matches the demo, ready for your own content!
Preparing Your Site for Manual Installation
Before starting the installation, you'll want to ensure that the install process will complete without a hitch. For this reason, it's important to move any existing widgets you have previously placed in any widget position in your Appearance → Widgets section are moved to the Inactive Widgets section, or deleted entirely if you no longer wish to use them; this will leave you with no active widgets in any widget positions.
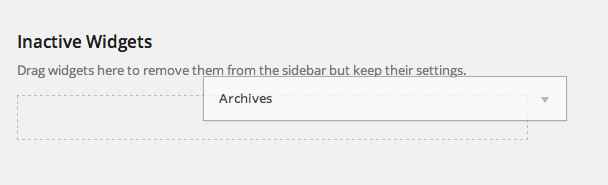
This step is necessary as, barring some common sections, the widget areas where your widgets are placed are exclusive to the theme; if you move from one theme to another the widgets will often be moved to a new widget area which can damage the overall theme aesthetic. For example, your current theme may only have a single widget position where all widgets are assigned, such as the sidebar. However, your new theme may have several widget positions depending on the complexity, such as header areas, banners, multiple sidebars and more. Once the theme is installed and activated, the widgets from your old theme may be inadvertently assigned to the first position of the new theme, which may not coincide with your older layout and will make your new theme look rather messy until the widgets are removed/reassigned.
Download and Install the Theme
Now that you're ready to install, the first thing to do is download and install the theme's zip package. Click on the following link to go to the Box Download Page (you must be logged-in to do so!). You'll see that there are three different files available:
- gk_box.zip - This package contains the basic theme files; this package is essential for manual installation, so make sure to download it.
- gk_box_quickstart.zip - This contains the quickstart files for a new installation of WordPress that matches the demo layout exactly; this can be ignored if you are installing manually.
- gk_box_rest_files.zip - This package contains the source PSD files for the theme; you shouldn't need these unless you intend to make some fundamental changes to the core design of the theme so this package can be ignored.
To keep things simple, download only the basic theme package. Once it's downloaded you can install the theme package by following these steps:
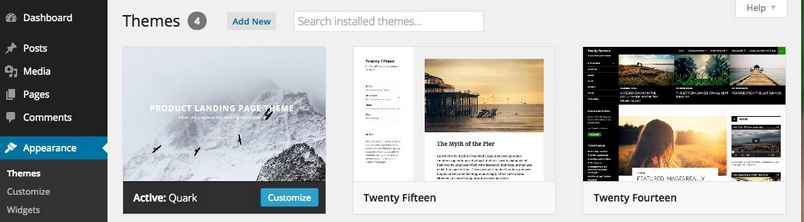
- Login to your WordPress backend and click on Appearance → Themes in the left menu to be taken to the Themes section of WordPress.
- Click on the blue Add New link at the top of the screen to open the Add Themes page.

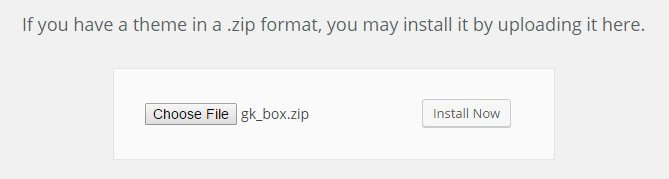
- Click on the blue Upload Theme link, located at the top of the screen as with the previous step.
- A dialogue box will open to allow you to select the theme package for upload. Click on the Choose File button and select your just-downloaded gk_box.zip file. Then, click the Install Now button to start the installation process.
- Wait a few moments whilst WordPress installs the theme's files. Once the install is complete, you will be given three options; Live Preview, Activate, or Return to Themes Page.
Click on Activate.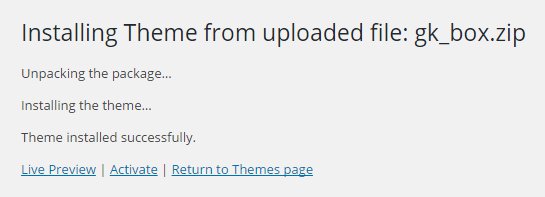
The theme is now installed and ready to go; next we need to take care of installing the plugins.
Installing Plugins
Plugins are a great way to expand your WordPress installation's capabilities, and in Box we use a combination of our own custom open-source plugins alongside established, trustworthy solutions such as WooCommerce and MailPoet to provide ecommerce and newsletter-related functionalities. The required plugins are:
- News Show Pro - This plugin creates article previews and showcases. With full control over whether to show featured images, titles and text snippets with multiple display options and pagination. In Box, the main function of this widget is to work alongside WooCommerce to create product previews on the frontpage, helping you to advertise your latest products or popular offers. This functionality can be applied using a widget or, as is the case on Box's frontpage, by using a shortcode in your page content.
- Tabs - This widget creates tabbed areas that can then display other widgets; though it isn't required to match the demo layout, the functionality included in this plugin and its synergy with News Show Pro means that it is recommended that it is installed.
- Widget Rules gives you control over which pages and posts a widget should appear on, so you can create specific widget instances to match all types of content. This is used to limit widgets to particular pages or areas of your site.
- WooCommerce - The most popular ecommerce solution for WordPress, WooCommerce provides a huge amount of sales options, from product page creation, checkout processes, categories, discounts and more. This plugin is essential if you wish to complete sales via your website.
- MailPoet - Providing a flexible yet easy-to-understand newsletter functionality, MailPoet allows for the creation of sign-up forms, mailing lists and newsletter content all within your WordPress backend, providing a clear avenue for communicating directly with your customers.
Though these plugins are not included with the theme files, they may be installed with very little effort after theme installation by following these steps:
- After installing and activating the theme a message will appear at the top of the WordPress backend that tells you which recommended or required plugins the theme uses.

- Click on the Begin Installing Plugins text link that appears underneath the message; you will be taken to the Install Required Plugins screen.
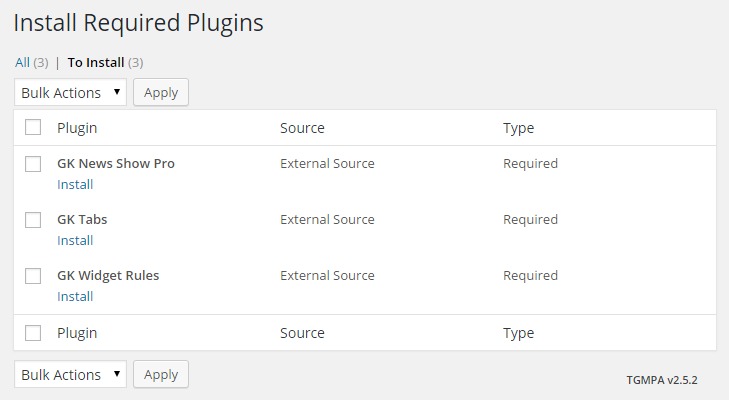
- On this screen there is a list of the recommended and/or required plugins; to the left of the Plugin title is a tickbox; click on this to add a tick to every plugin. Then, click on the Bulk Actions drop-down list and select Install, then click Apply.
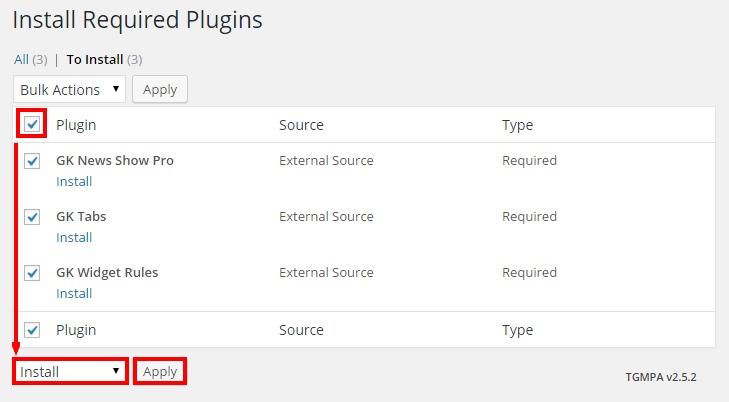
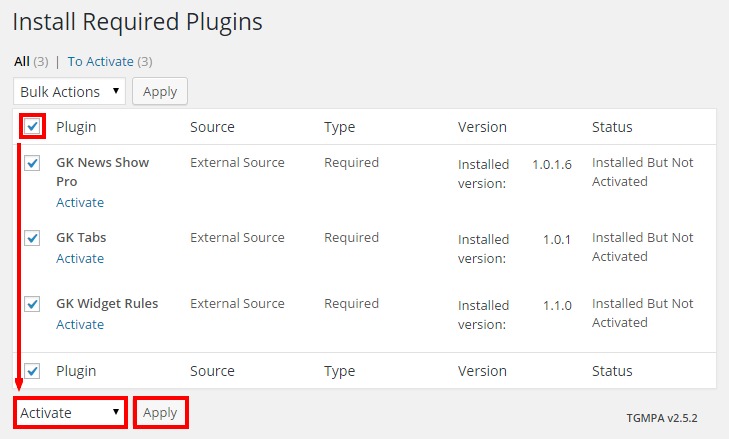
- Allow WordPress to run through the installation process for each plugin; you will see messages advising of each step of installation. Once it finishes, you will see a text link called Return to Required Plugins Installer; click on this link.

- Now that the plugins are installed, all that's left is to activate them. Like before, click on the tickbox next to the Plugin title to add a tick to every plugin, then select Activate in the Bulk Actions drop-down list and click Apply.
Once these steps are completed all of the plugins that you'll need to match the demo will be installed and ready to go, so we can now focus on importing the content from our demo so that you can match its layout.
Importing the Demo Content
This step will import all of the example products, articles, categories and menus from our demo layout, including the pages needed to create the frontpage. Importing requires two steps; first we need to install the tool that will let us import the demo content, the WordPress Importer. Then, we need to download the demo content and use the WordPress Importer to import it to our site.
Installing the WordPress Importer
The Import/Export option exists in the WordPress backend even in a new installation, but the core plugin that hands the process is not included with the WordPress core, so it must be installed if you haven't done this already. To do so, follow these steps:
- Log-in to your WordPress backend and click on Tools → Import in the left menu. A new screen will open with a list of options for systems that you can import posts into WordPress from, including Tumblr, LiveJournal and more.
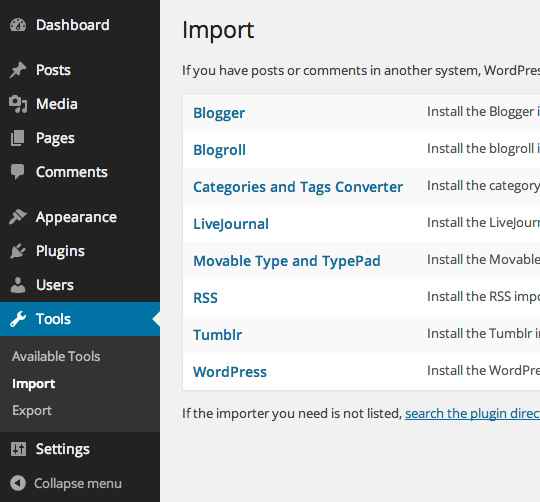
- The demo content we will be importing comes from a WordPress installation, so click on WordPress in the list of systems. A pop-up will open with an option to install the WordPress Importer.
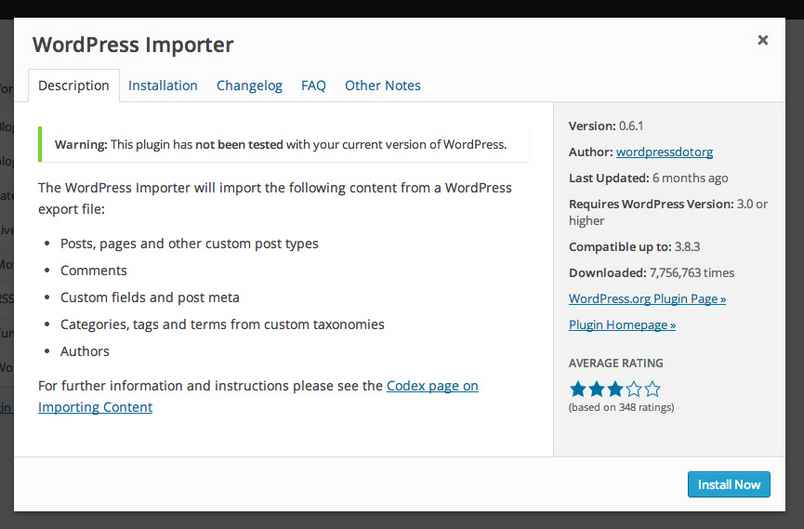
- If you want a bit more information on what can be imported, take a moment to read through the description. Once done, or if you don't fancy reading, you can click the Install Now button to start the installation process.
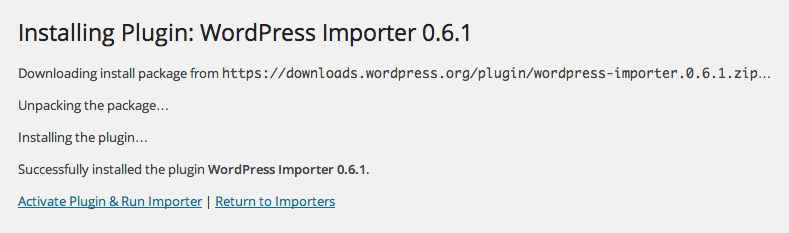
- WordPress will run through the download and install process automatically, so relax for a moment and let it do its thing. Once the install is complete you will see a message and two text options that let you activate and run the newly-installed plugin, or go back to the list of system importers. We'll be importing our WordPress content soon, so click on Activate Plugin & Run Importer.
After a moment you will be taken to the Importer's start screen, ready for a file to be uploaded. However, we don't yet have the file to upload; we'll take care of that now.
Downloading and Importing the Content
All the demo content data is contained in what WordPress calls a WXR file, though it is more commonly called an XML file. We'll need to download this file and use the WordPress Importer to install it on our site.
The list of available XML files for our themes may be found on this theme documentation page ; you will see a list of links, each pointing to a theme's XML file; simply find your chosen style in the list.
If you just click on the link for the Box WXR file you might encounter an issue; instead of downloading, your browser will instead open and display the file contents automatically. To get around this, we'll need to tell the browser that we want to download, rather than display the file:
- In Safari - Right or control-click on the link and select ‘Download linked file’. This will download a file called Box.xml.
- In Chrome - Right-click on the link and select ‘Download link as…’. A dialogue box will open to specify where the download should be saved. The name will default to ‘Box.xml’, so just leave this as default and save the file.
- In Firefox - Right-click on the link and select ‘Save link as…’. A dialogue box will open where you can specify the save location; as with the other browsers the name will default to 'Box.xml' so leave this as it is.
- In Internet Explorer - Right-click on the link and choose 'Save Target as'. A dialogue box will open so you can decide where to download the file to. The file name will default to 'Box.xml', so leave this as it is.
Now with the file downloaded we can import the content into WordPress:
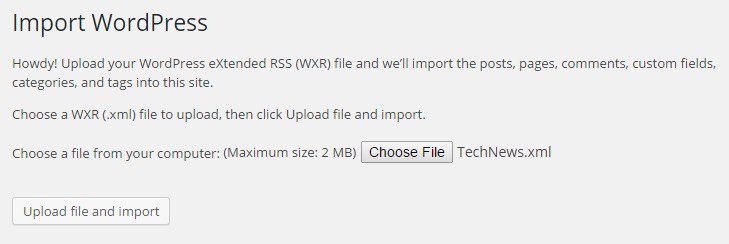
- Navigate back to your WordPress backend and open the WordPress Importer by clicking on Tools → Import → WordPress; if the importer is still open after the install then you may obviously skip this step!
- Click on Choose File and select the 'Box.xml' file you just downloaded, then click on the Upload file and import button.
- After a few moments you will see the Assign Authors page. This area will let you decide who gets to be in charge of the content you are importing; you may import the original authors, create a new author, or assign the content to your existing users. There may only be one or two authors who may be imported, or there may be as many as ten, especially if the theme includes BuddyPress since each BuddyPress user in the demo content will be considered a separate author. One of the following options will need to be set for each author and their content that is to be imported:
- If the option is left blank - The original creator's username will be imported into your WordPress, and the imported content assigned to the imported username.
- If a name is entered in the 'Create new user with login name' field - The name you wrote in the field will be used as the username for a new user, and the imported content will be assigned to this new user.
- If a user is selected in the 'Assign posts to an existing user' drop-down list - Once the content is imported it will be assigned to the user that you selected in the drop-down box.
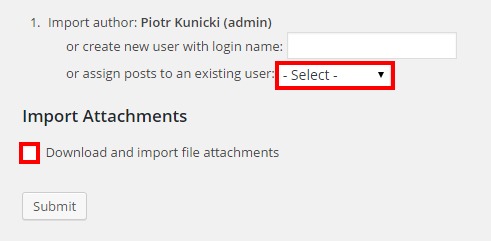
- Now click on the Download and import file attachments tick-box; if selected then the demo placeholder images and other media from the demo will be imported along with the posts.
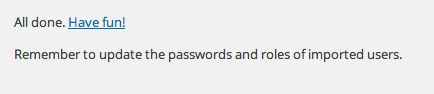
- Finally, click on the Submit button to start the importing process. Wait for the process to complete; once done, you will see a confirmation message letting you know everything is finished.
The demo content is now ready to go; now it's time to start on preparing your frontpage. This will, for the most part, be an automatic process; we'll just need to assign the static frontpage template so that the theme knows where to look for its frontpage content and the homepage will be set up automatically.
Assigning the Static Frontpage
The entirety of the Box frontpage is created using pages; a core frontpage template is assigned, and subpages of the base page provide the HTML code, shortcodes or images that will then be displayed on the frontpage. Since we've imported the demo content in the last section, we now have a set of ready-prepared content for our frontpage that we can apply simply by assigning the imported frontpage as our static frontpage. To do so, first open the WordPress Customizer by clicking on Appearance → Customization in your WordPress backend.
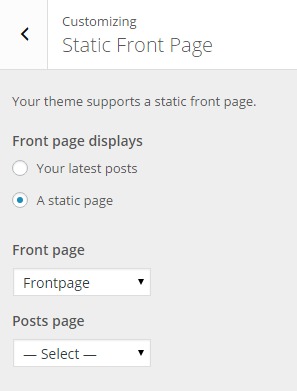
Now click on the Static Front Page section to open its options. You'll see two radial buttons that let you use your Latest Posts as your frontpage, or a Static Front Page. Make sure the Static Front Page radial button is checked. Now, in the Front Page drop-down list, find the page called Frontpage and click on it.
Once done, click on the blue Save button at the top of the customizer to save changes; the static frontpage is now set. And that's it! The imported demo content pages will automatically be used to create the frontpage sections, and your frontpage will now match the demo layout. We're not quite finished yet though; we still need to configure the theme's menus that were imported along with the demo content, and also create the additional widgets that will be used to provide the links, address and newsletter sign-up form that appear at the bottom of every page, the shopping cart functionality, and the search bar functionality. If you wish to use the newsletter field we'll also need to create a sign-up form template in MailPoet.
Configuring Additional Widgets
There are only three widgets that need to be created in addition to the existing page content; a search widget to enable easy searching on your site, the shopping cart so users can check what they've got in their cart on any page, and a set of footer links and newsletter sign-up form that you'll see on every page of the demo. Let's look at creating each of these in turn:
The Search Bar
As simple as a widget can be; the search bar appears at the top-right of each page of the theme:

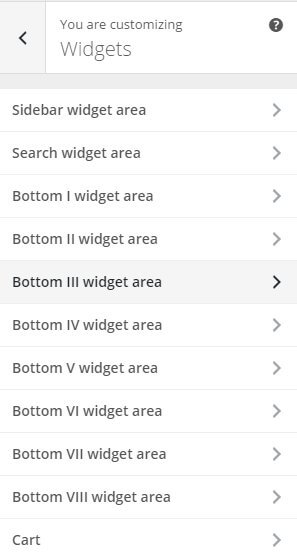
To add this widget we'll use the WordPress Customizer. In your WordPress backend, click on Appearance → Customize to open the Customizer; once it opens you'll see the various options available in the left sidebar, with a live preview of your site taking up the rest of the view area. In the list of options, click on Widgets; this will open a new list displaying all of the widget areas that are included in Box. In this list, click on the Search Widget Area section to load the widget list. Since there are no widgets in this section yet, all you'll see is a short description of the widget area and an Add a Widget button:
Click on the Add a Widget button to expand a second list displaying all the available widgets, and click on the Search option:
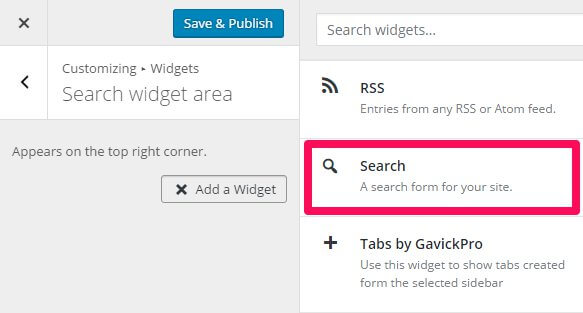
There's no options that need to be set for this simple widget, so just click the Save & Publish button at the top of the screen to save the changes and it's ready.
The Footer Links
This section contains the general site links, newsletter sign-up form and social media links for the site:

Since this section will display a newsletter sign-up form provided by MailPoet alongside the links, we'll first need to create the form to ensure it matches the demo layout.
Creating the MailPoet Newsletter Form
In your WordPress backend click on MailPoet → Settings to go to the options page, then click on the Forms tab; you'll see a list available forms, which since this is a new installation of the plugin will include one or two demo forms. It is highly recommended that you delete these example forms as each form generates an ID number that will be used in the HTML code to specify which form to display; by deleting the demo ones, you can ensure that your new form will have the ID "1", which makes it easier when creating the footer widget. To delete the forms, hover over the form's name in the list; the options available for the form will appear. Now click on the Delete button to remove it. Once all the demo forms are removed we can start afresh with a new form, so click on the Create a new form button at the top of the section.
In the Edit New Form page, you'll see the elements to create your own form. The main field on the left displays the form, and on the right is a set of different form elements that you can drag and drop onto the main field to create the form bit by bit.

The form has two elements already added; an Email field, and a Subscribe button. To match the demo layout we'll just need to modify one of these elements. Mouse over the email field in the main left area; an Edit Field button will appear. Click on this button to open a popup where you can modify the element.
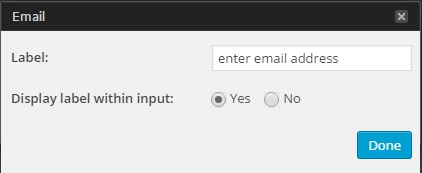
Change the Display Label in Input option to Yes, then click the Done button to save changes. Now add a name for your form in the Edit Name field at the top of the page (the demo uses "Subscribe to Box" and click the Save button at the bottom of the page to save the new form; it's now ready to be used in the widget.
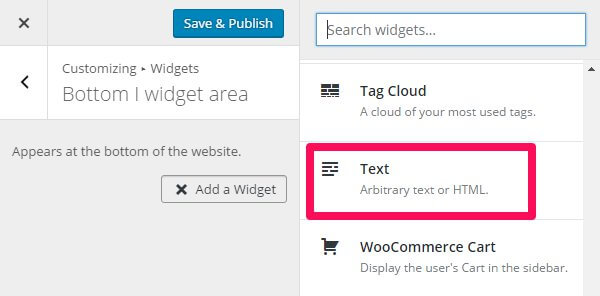
Creating the Footer Widget
To create this section we'll need to use a Custom HTML widget along with some HTML code to create the links and forms. In your WordPress Customizer, click on Widgets and select the Bottom I widget area to expand the section. Again, this area should be clear of widgets, so click on the Add a Widget button and choose the Text widget from the list of available widgets:
You'll see two main sections to this widget; the first is the Title field, which we can leave blank. The second is the Content field; here is where the HTML code you wish to use needs to be added. To match the demo, copy and paste the following HTML code into the content field:
                              <div class="bottom__box">
                              <ul class="bottom__links">
                                   <li><a href="#">Contact</a></li>
                                   <li><a href="#">Center </a></li>
                                   <li><a href="#">Legal Notice</a></li>
                                   <li><a href="#">Privacy </a></li>
                                   <li><a href="#">Location</a></li>
                              </ul>
                              <ul class="bottom__links">
                                   <li><a href="#">Contact </a></li>
                                   <li><a href="#">Center </a></li>
                                   <li><a href="#">Legal Notice</a></li>
                                   <li><a href="#">Privacy </a></li>
                                   <li><a href="#">Location</a></li>
                              </ul>

                              <h3>Subscribe to BOX</h3>
                              [wysija_form id="1"]
                              </div>

                              <div class="bottom__contact">
                              <div class="bottom__contact-address">Wj 34 Hamilton Road, Phillipsburg, NJ 012345
                              <br /> +1 12 345 1234 5678
                              </div>
                              <div class="bottom__contact-socials">
                              <a href="#" class="gk-social-icon">
                              <i class="gk-social-icon-twitter"></i>
                              </a>
                              <a href="#" class="gk-social-icon">
                              <i class="gk-social-icon-fb"></i>
                              </a>
                              <a href="#" class="gk-social-icon">
                              <i class="gk-social-icon-gplus"></i>
                              </a>
                              <a href="#" class="gk-social-icon">
                              <i class="gk-social-icon-vimeo"></i>
                              </a>
                              <a href="#" class="gk-social-icon">
                              <i class="gk-social-icon-linkedin"></i>
                              </a>
                              <a href="#" class="gk-social-icon">
                              <i class="gk-social-icon-instagram"></i>
                              </a>
                              <a href="#" class="gk-social-icon">
                              <i class="gk-social-icon-pinterest"></i>
                              </a>
                              </div>
                              </div>
Feel free to modify any of the data to match your own if preferred. Once done, there's one more option that needs to be set. Click on the Widget Rules button under the content section to expand its options; this is where we can set which pages the widget appears on and also add extra CSS styles. In the Custom CSS Class field, add the following text:
gray-bg animated-circles
The options are now set, so click the Save & Publish button to save changes.
The Shopping Cart
You won't be able to sell many products if visitors can't check what's in their shopping cart! This widget provides the functionality:

To set-up this widget, open the Widgets area of your WordPress Customizer and click on the Cart section at the bottom of the widget list to expand its options. Then, click on the Add a Widget button. In the list of available widgets, choose the WooCommerce Cart widget. The default options for this widget are fine, so now click Save and Publish to save changes.
That's all the widgets created, so we now just need to assign the menus and your site is ready!
Assigning the Menus
There are three menu positions in Box; the main menu, the footer menu, and the top menu that appears above the main menu. The demo content we imported included example menus that we can use, so you don't need to create new ones yet if you don't wish to, but we will need to assign the correct menus to their respective positions.
To do so, open your WordPress Customizer and click on the Menus option to see a list of menus; you should see a list of three available menus called Footer Menu, Main Menu and Top Menu, which makes it easy to guess which menu goes in which position! To assign these menus, click on the Menu Locations button above the menus; you will be taken to a list of the menu locations with drop-down lists where you can set which menu appears in each location.

Simply assign each menu to their namesake menu position; the Footer Menu should be assigned to the Footer Menu position etc...
Once finished click the Save & Publish button to save the changes, and your menus are configured!
Your site should now match the layout as seen in our demo, so you can start repurposing the various elements and other content to meet your needs.