Offer a translated WordPress theme with this in-depth tutorial
It may be hard to believe now, but once upon a time WordPress was just a simple blogging platform; no-one really knew that it was going to take off the way it did. Now here we are more than ten years later, and WordPress holds the lion’s share of the total CMS install base, thanks in part to intuitive design and an ever-expanding list of features that makes it even more flexible, and the perfect choice for a range of websites. With WordPress’ constant growth, it’s natural that its appeal will move far beyond its original borders, and now websites the world over rely on WordPress to deliver their content. Nowadays, WordPress can be installed in virtually any language you can imagine, but if you’re making a site in your native language you’ll want to ensure that you can translate all the aspects of a theme too; read on, and learn how you can switch our themes over to whatever language you require.
As we’ve watched WordPress grow, the number of our customers interested in developing a site in a non-English language has grown exponentially; no matter where in the world you’re from, it’s nice to have a website where you can express your thoughts. All of our themes are provided in English, so how would you go about translating the WordPress front-end into another language? Surprisingly easily, is the answer, because we’ve been careful to ensure that all our themes offer a comfortable translation solution as standard.
How to successfully translate your WordPress theme
Now, we may have just said that translating themes is easy, and it is. But easy doesn’t mean quick; any kind of translations are naturally labor-intensive and will take a bit of time for you to get sorted. Still, as Laozi said, even a journey of a thousand miles starts with a single step; and in this case the single step is a .pot file. What’s a .pot file? It’s essentially a language file in a format used by many major CMS’ and applications that stores the strings used in a given item, be it a theme, widget or plugin. All of our WordPress themes include a .pot file which can be found in the theme’s “language” folder; just extract the theme package to get access to this folder. Alternatively, if you’ve installed our quickstart package to get yourself a complete site from scratch, then you can still get the .pot file via FTP; just connect to your server and navigate to the /wp-content/themes/gavickthemename/languages folder. Inside you should find a language file that uses the a themename.pot naming convention i.e. if you’re using the Shop and Buy theme, then the .pot file will be ShopAndBuy.pot.
So you’ve got the file, but unfortunately if you want to display your front-end text in a different language you can’t just modify this core file. Instead, you need to create two new language file types; .po and .mo, as the core .pot file is used as a base from which translations are derived; this means that it cannot be changed from the native language without causing issues.
Technically you can create these files with any standard text editor (though in some cases you’ll have to change some settings to ensure the encoding is correct), but for best results we strongly recommend that you use a dedicated tool such as Poedit, an easy-to-use open-source program available for Mac OS X, Windows and UNIX/Linux that offers extensive options directly related to sorting out your .po and .mo files. Seriously, go download it now and get it installed!
All sorted? Then let’s get our translation started:
- Open Poedit and click on File -> New catalog from POT file in the main menu and select the POT file in your theme’s languages folder (remember that this will use the name of your theme i.e. ShopandBuy.pot).
- A properties box will open up where you must enter some general information. First up, in the Language field enter the language name you want to translate.
- Click the “OK” button; you’ll be asked what you want to name your translation file. Now, usually with filenames it doesn’t matter what you call it, but translation files are a lot stricter and the file name is crucial to your translation working correctly. Each language and country has a specific code you will need to use when saving translation files; for instance, if you’re going to translate a GavickPro WordPress theme into Spanish you’ll name your file “es_ES.po”, whereas if you’re translating into German you’ll name the file “de_DE.po”. To break it down; the first lower-case letters define the language, whereas the second upper-case letter define the country. In many cases the language and country will be the same, hence “de_DE” for Germany, but what about languages like English or Portuguese, that are spoken in several countries natively? In these cases there will be a difference in the first and second letter pairs; for the UK, the code would be en_GB, whereas for the USA it will be en_US. If you’re not familiar with the codes for your native language and country you can head over to the GNU website, where they have all the codes for Language and Country. Remember, if you use the wrong naming convention WordPress won’t be able to use your translation, so double-check if necessary.
- Something a bit easier after the rigmarole of sorting out your file naming; just save your new language file.
- Now you can start translating the theme via the String Translation mechanism. This provides direct like-for-like translations. This is where things will take a bit of time; go through each line one-by-one, adding the translation to your native language as you go.
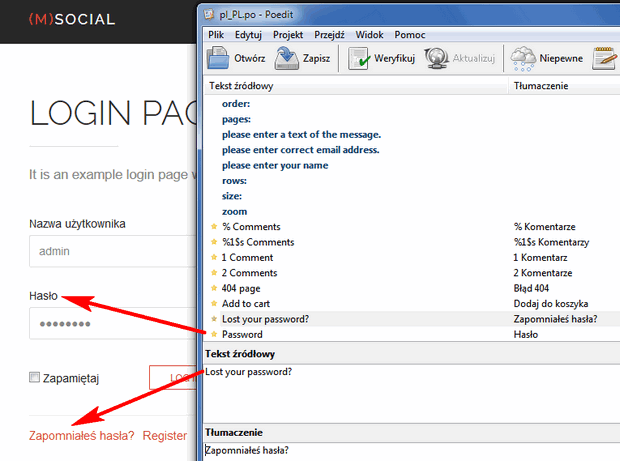
If you think there’s some text that won’t require translation or you’re not sure what to translate it to you can just leave them as they are in the original language; you can always come back and translate them later if need be. To illustrate how easy the translation process is, here’s a shot from the Polish translation process:
- Don’t forget to save your file once you finish the translation; you really don’t want to lose all you hard work now! Don’t worry about creating the .po and .mo files; Poedit will automatically create and save both of these files for you.
Translation Tips: Character Encoding
If you’re used to working in HTML or through the WordPress editors then there are a few areas which might catch you out when creating the translations; here’s a few tips to help you get things done: First of all, any localizations should use UTF-8 encoding. This is one of the reasons we recommend Poedit; this kind of seemingly minor issue is already accounted for in a dedicated program. If you were to edit the files via a standard, simple editor like notepad, then the default settings will usually use different encoding. You won’t actually notice this when working on the file, but once you save it you’ll notice that all your translated elements are displaying the identifying string rather than the original or new language. You can just open and resave the file with the proper encoding, but using a dedicated program will prevent this happening in the first place, so it’s probably the safer solution! When writing your translations you should write your translations plainly; that is, avoid escaping accented and special characters with HTML character entities, save for a select group that are expected to be escaped to avoid conflict with XHTML markup: angle brackets (< & >), and ampersands (&). In addition, there are a few other characters that function better when escaped, such as non-breaking spaces ( ), angle quotes (« and »), curly apostrophes (’) and curly quotes. When we create multilingual sites, we need to remember that translation is not everything; localization goes beyond just translating words and expands to include adapting the site to a different language, country and conventions. Some words simply don’t mean the same thing or carry the same implications as other languages, so don’t translate literally; translate organically; try to get a feel for the meaning behind the original text, and capture that spirit in your translation.
How to use your translated language files in WordPress
Not so fast! You may have managed to successfully translate the entire file, but configuration is not over yet. Once translation has been finished, the first thing to do is to get your language and country code and keep it handy so you can tell WordPress which language file to use. You’ll need to make sure your wp-config.php file settings match your language files; this configuration file is located in the main directory where all your core WordPress files are located. You’ll need to open the wp-config.php file and set your language accordingly, like this:
/**
 * WordPress Localized Language, defaults to English.
 *
 * Change this to localize WordPress. A corresponding MO file for the chosen
 * language must be installed to wp-content/languages. For example, install
 * es_ES.mo to wp-content/languages and set WPLANG to 'es-ES' to enable Spanish
 * language support.
 */
define('WPLANG', 'es-ES');
The last step is to upload your created language files to the language folder of your theme using FTP / SFTP. If you’re using a Spanish translation, for example, you’ll need to upload the es_ES.po and es_ES.mo files to your theme folder.
Important notes
Your internationalization should be complete! Bear in mind that though you’ve gone through the trouble of translating your theme frontend, your WordPress backend is untouched and will still be in English. If your clients are intending to make modifications themselves it may be worthwhile taking the time to translate your theme’s admin area too; you can find our more about this topic in the following documentation article.
More resources regarding how to translate WordPress into your language is located here.
Share your Language files with others
If you’ve already translated a theme then many of our users would be delighted if you could share your translation files with the community. Just get in contact with us via our Helpdesk ticket system and we will include the translation files in the next theme update if possible. Thank you very much for your contribution, and we hope this guide has been helpful in getting your translation started!
This article was first published
