Installation Default Restaurant Ecommerce
Introduction
This guide provides complete details on placing and configuring modules to match the demo layout of the Restaurant style for Quark. It includes information on setting up three additional areas:
- Frontpage Modules.
- Additional Pages.
- Menus.
Before starting, make sure that you have followed all the steps in the Quark Core Installation Guide, as this tutorial assumes that you have already installed the template, modules and extensions needed. If you have already taken the steps covered in the core guide, then we are ready to start placing the frontpage modules.

Frontpage Modules
The frontpage modules will provide the first impression for your site, so it is imperative that they are placed and configured correctly. We will cover each module position of the frontpage in turn, starting from the header position and working down to the footer_nav position.
Before starting module placement it is advisable that you disable the TinyMCE or other WYSIWYG editors. This is because these editors automatically cleans up empty HTML tags, but many of the modules in Quark are custom HTML modules that use blank tags to create icons or for additional CSS purposes, so these empty tags shouldn't be removed. Since the clean-up cannot be disabled it is instead necessary to disable the editors.
In order to disable the WYSIWYG editor:
- Click on Users → User Manager in the top menu of your Joomla backend to be taken to a list of your registered users.
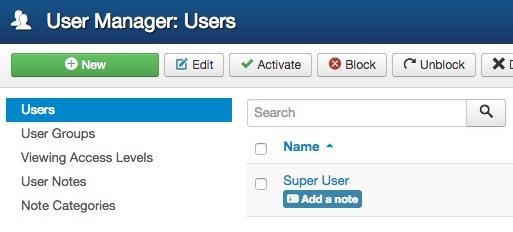
- Click on the username you will be logged in as when placing the modules to be taken to the Edit Profile screen.

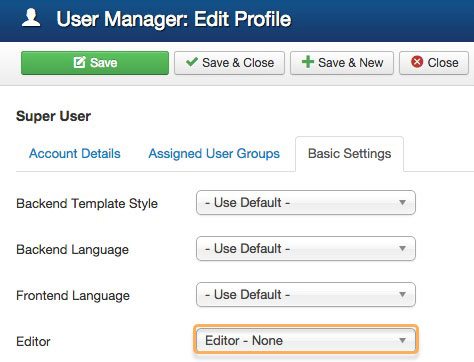
- Click on the Basic Settings tab and change the Editor option from Use Default to Editor - None.
- Click on Save & Close at the top of the screen to save changes.
Now when you open the editor in an article or Custom HTML module you will see just the plain text editor, and empty tags will not be automatically removed. Once you have finished module placement you may wish to reactivate the editor for the user should you intend to use it to write articles.
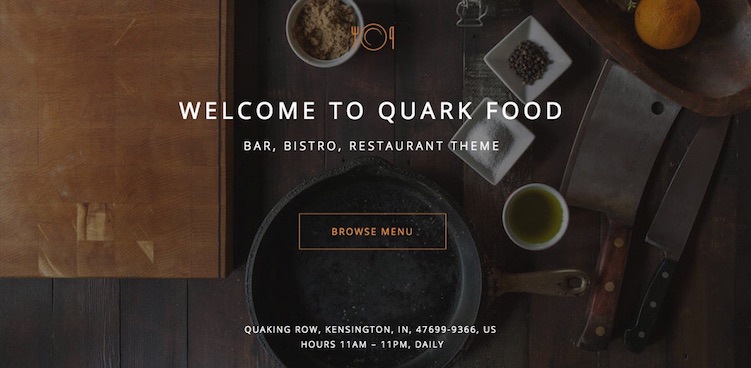
The Frontpage Header
The header provides a simple but effective full-width block with animated elements and text for that extra sophisticated touch. To configure the frontpage header:
- Open your Module Manager as per the instructions above in the Module Placement section, and click on New.
- Select a Custom HTML module from the list of available module types; you will be taken to the main screen for the module.
- Enter a title of your choice; this will not be shown on the actual frontpage for visitors to see, so give it a name that will help you identify the module, such as Frontpage Header.
- Copy and paste the following HTML code into the body of the custom HTML module:
<p><img class="parallax-img" src="/images/docs/quark/joomla/install/demo/restaurant-style/header_bg.jpg" alt="" /></p>
<div class="gkPage">
<h1 data-sr="enter bottom and move 50px">Welcome to Quark food</h1>
<p data-sr="enter bottom and move 50px and wait .2s">Bar, bistro, restaurant theme</p>
<a class="btn" href="#" data-sr="enter bottom and move 50px and wait .3s">Browse Menu</a></div>
<p><sub data-sr="enter bottom and move 50px and wait .3s">Quaking Row, Kensington, IN, 47699-9366, US <br />Hours 11am – 11pm, daily</sub></p>
- Click on the Position drop-down list and select the Header position under the gk_quark module positions.
- Click on the Menu Assignment tab at the top of the screen. You will see an option called Module Assignment with a drop-down list. Click on the drop-down list and select Only on the pages selected. You will see a list of available pages to assign the module to.
- If it isn't already marked, add a tick to the Main Menu → Home option, which points to the homepage. All other pages should be left unticked.
- Click Save & Close at the top of the screen to save the module. Your header is now configured.
Frontpage Mainbody
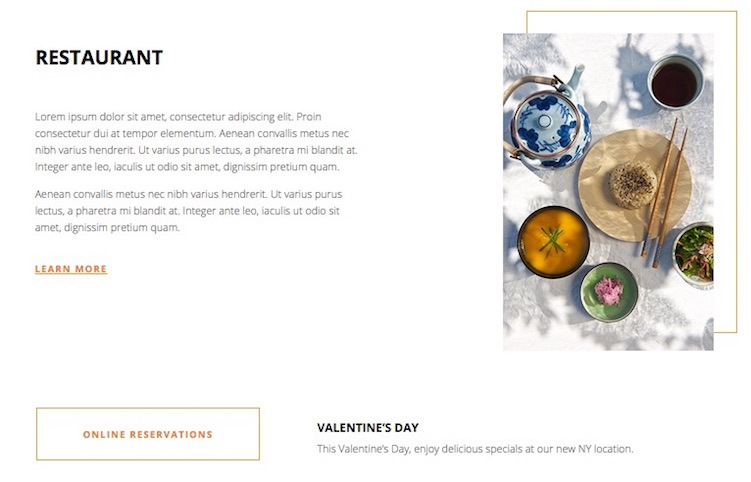
The Mainbody section of the frontpage contains an image with formatted text along with a Learn More button. You may place whatever text content you desire here, but it works brilliantly as an introduction to your company.
To setup this section:
- Open your Module Manager and click on New.
- Select a Custom HTML module from the list of available module types to be taken to the configuration screen.
- Enter a title of your choice; this will not be shown on the frontpage, so give it a name that will help you identify the module, such as Frontpage Mainbody.
- Copy and paste the following HTML code into the body of the custom HTML module:
<div class="gk-cols" data-cols="2">
<div class="gk-intro">
<h3>Restaurant</h3>
<p>Lorem ipsum dolor sit amet, consectetur adipiscing elit. Proin consectetur dui at tempor elementum. Aenean convallis metus nec nibh varius hendrerit. Ut varius purus lectus, a pharetra mi blandit at. Integer ante leo, iaculis ut odio sit amet, dignissim pretium quam.</p>
<p>Aenean convallis metus nec nibh varius hendrerit. Ut varius purus lectus, a pharetra mi blandit at. Integer ante leo, iaculis ut odio sit amet, dignissim pretium quam.</p>
<a class="gk-read-more" href="#">Learn more</a></div>
<div><span class="gk-image-border gk-right gk-border-anim" data-sr="enter right and move 100px over .01s"><img src="/images/docs/quark/joomla/install/demo/restaurant-style/restaurant_image.jpg" alt="Restaurant" /></span></div>
</div>
<div class="gk-cols" data-cols="2">
<div class="col-width-40 col-t-width-50"><a class="btn large" href="#" data-sr="enter left and move 100px and wait 0.2s">Online reservations</a></div>
<div class="col-width-60 col-t-width-50 gk-intro-small" data-sr="enter right and move 100px and wait 0.2s">
<h3>Valentine’s Day</h3>
<p>This Valentine’s Day, enjoy delicious specials at our new NY location.</p>
</div>
</div>
- Click on the Position drop-down list and select the mainbody position under the gk_quark module positions.
- Click on the Menu Assignment tab at the top of the screen. You will see an option called Module Assignment with a drop-down list. Click on the drop-down list and select Only on the pages selected. You will see a list of available pages to assign the module to.
- If it isn't already marked, add a tick to the Main Menu → Home option, which points to the homepage. All other pages should be left unticked.
- Click Save & Close at the top of the screen to save the module. The mainbody is now configured.
Frontpage Parallax Image
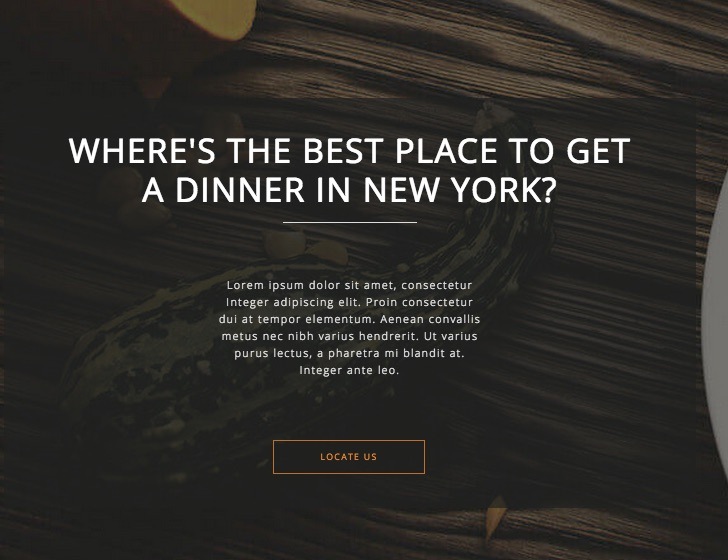
The Parallax Image section of the frontpage contains a stunning full-width image that looks beautiful on any size screen, with a transparent text overlay and parallax scrolling effect for a modern and stylish section.
To setup this section:
- Open your Module Manager and click on New.
- Select a Custom HTML module from the list of available module types to be taken to the configuration screen.
- Enter a title of your choice; this will not be shown on the frontpage, so give it a name that will help you identify the module, such as Frontpage Image Overlay.
- Copy and paste the following HTML code into the body of the custom HTML module:
<div class="gk-parallax-overlay" data-sr="enter bottom and move 100px and scale up 10%">
<h2 data-sr="enter bottom and move 50px and wait .4s">Where's the best place to get a dinner in New York?</h2>
<hr data-sr="enter bottom and move 50px and wait .45s" />
<p data-sr="enter bottom and move 50px and wait .6s">Lorem ipsum dolor sit amet, consectetur Integer adipiscing elit. Proin consectetur dui at tempor elementum. Aenean convallis metus nec nibh varius hendrerit. Ut varius purus lectus, a pharetra mi blandit at. Integer ante leo.</p>
<a class="btn" href="#" data-sr="enter bottom and move 50px and wait .7s">Locate us</a></div>
- Click on the Position drop-down list and select the bottom1 position under the gk_quark module positions; if the position is not visible in the list then you may write it into the Position field manually (use lower-case letters only).
- Open the Menu Assignment tab, then click on the drop-down list and select Only on the pages selected to see a list of available pages to assign the module to.
- If it isn't already marked, add a tick to the Main Menu → Home option, which points to the homepage. All other pages should be left unticked.
- Click on the Advanced tab and add the following text to the Module Class Suffix field:
parallax-bg very-big-spaces - Click Save & Close at the top of the screen to save the module. The mainbody is now configured.
Frontpage Menu

The Frontpage Menu is a tantalizing glimpse into your kitchen's offerings that's sure to make a few visitors take the plunge and book a table for dinner! A pleasant framed image on the left, basic menu info on the right and links to the full-size menu page combine to tempt diners to your establishment.
To create this section:
- Open your Module Manager and click on New.
- Select a Custom HTML module from the list of available module types to be taken to the configuration screen.
- Enter a title of your choice; this will not be shown on the frontpage, so give it a name that will help you identify the module, such as Frontpage Menu.
- Copy and paste the following HTML code into the body of the custom HTML module:
<div class="gk-cols" data-cols="2"> <div class="col-width-40"><span class="gk-image-border gk-left gk-border-anim" data-sr="enter left and move 100px"><img src="/images/docs/quark/joomla/install/demo/restaurant-style/menu_image.jpg" alt="Menu" /></span></div> <div class="gk-menu col-width-60"> <h3>Quark Menu</h3> <div class="gk-cols" data-cols="2"> <div> <dl> <dt>Lemon Chicken (Gluten-Free)</dt> <dd>$ 30.00</dd> <dt>Sweet & Sour Chicken</dt> <dd>$ 25.00</dd> <dt>Stir Fried Teriyaki Chicken</dt> <dd>$ 80.00</dd> <dt>Basil Shrimp</dt> <dd>$ 45.00</dd> <dt>Yu Shange Scallop</dt> <dd>$ 66.00</dd> </dl> </div> <div> <dl> <dt>Yu Shange Scallop</dt> <dd>$ 66.00</dd> <dt>Lemon Chicken</dt> <dd>$ 30.00</dd> <dt>Sweet & Sour Chicken</dt> <dd>$ 25.00</dd> <dt>Basil Shrimp</dt> <dd>$ 45.00</dd> <dt>Stir Fried Teriyaki Chicken</dt> <dd>$ 80.00</dd> </dl> </div> </div> <a class="gk-read-more" href="#">Learn more</a></div> </div>
- Click on the Position drop-down list and select the bottom2 position under the gk_quark module positions; if the position is not visible in the list then you may write it into the Position field manually (use lower-case letters only).
- Open the Menu Assignment tab, then click on the drop-down list and select Only on the pages selected to see a list of available pages to assign the module to.
- If it isn't already marked, add a tick to the Main Menu → Home option, which points to the homepage. All other pages should be left unticked.
- Click on the Advanced tab and add the following text to the Module Class Suffix field:
big-spaces - Click Save & Close at the top of the screen to save the module. The mainbody is now configured.
The Video Background Reservation
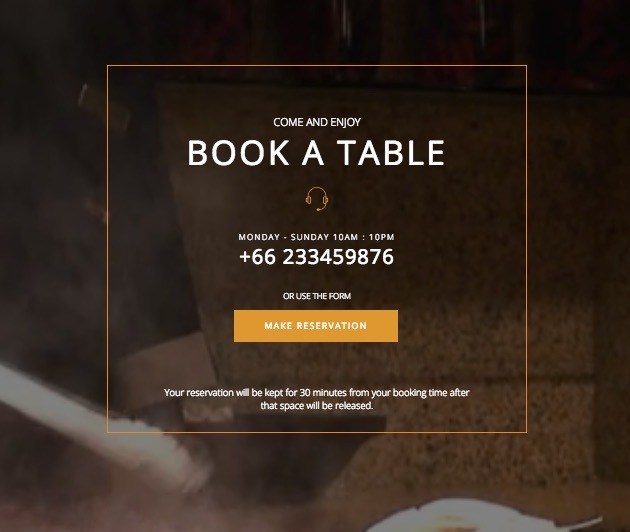
This section is one of the most striking areas of the Restaurant style, with a large background video framing a potent call to action that links to your reservation page, it's the section that's sure to convert those still on the fence after seeing your eatery info and menu.
To create this section:
- Open your Module Manager and click on New.
- Select a Custom HTML module from the list of available module types to be taken to the configuration screen.
- Enter a title of your choice; this will not be shown on the frontpage, so give it a name that will help you identify the module, such as Frontpage Video Background.
- Copy and paste the following HTML code into the body of the custom HTML module:
<div class="gk-border-box" data-sr="enter bottom and move 100px and scale up 15% over .8s"><sup>Come and enjoy</sup>
<h2>Book a table</h2>
<span class="gk-phone-number"> <sup>Monday - Sunday 10AM : 10PM</sup> <strong>+66 233459876</strong> </span> <span class="gk-reservation-button"> <sup>or use the form</sup> <a class="btn" href="/index.php/booking" data-sr="enter bottom and move 20px and wait .4s">Make reservation</a> </span> <small>Your reservation will be kept for 30 minutes from your booking time after that space will be released.</small></div>
<p><video poster="/images/demo/restaurant-style/bg.jpg" autoplay="autoplay" loop="loop" muted="">
<source src="/images/docs/quark/joomla/install/demo/restaurant-style/bg.mp4" type="video/mp4" />
<source src="/images/docs/quark/joomla/install/demo/restaurant-style/bg.ogg" type="video/ogg" />
Your browser does not support the video tag.
</video></p>
- Click on the Position drop-down list and select the bottom3 position under the gk_quark module positions; if the position is not visible in the list then you may write it into the Position field manually (use lower-case letters only).
- Open the Menu Assignment tab, then click on the drop-down list and select Only on the pages selected to see a list of available pages to assign the module to.
- If it isn't already marked, add a tick to the Main Menu → Home option, which points to the homepage. All other pages should be left unticked.
- Open the Advanced tab and add the following text into the Module Class Suffix field:
video-bg
- Click Save & Close at the top of the screen to save the module. The video teaser is now configured.
Events
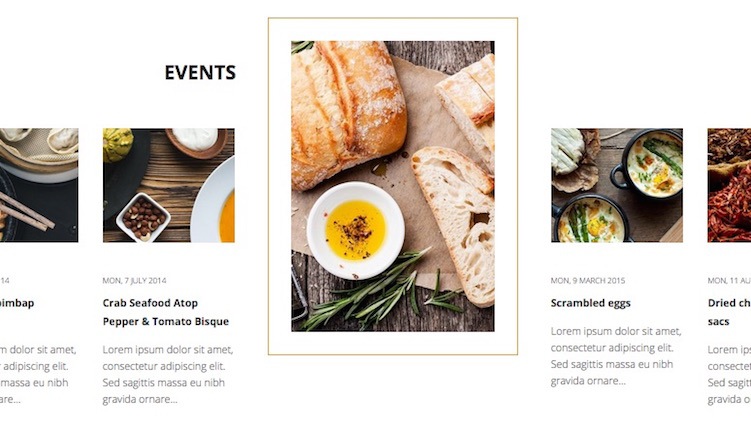
Regular visitors to your restaurant might become bored with the menu, despite its quality. With this section you can advertise special events or menus to encourage return visits, or connect with your customers directly with informative blog links. This section uses our powerful News Show Pro module to create previews of your latest K2 or Joomla articles, whether all articles or by category. The main image of each post, along with the title, text snippet and other post info are contained in the previews, with a link to a full list of posts underneath.
To create this section:
- Open your Module Manager and click on New.
- Select the News Show Pro GK5 module from the list of available module types to be taken to the configuration screen.
- Enter a title of your choice; this will not be shown on the frontpage, so give it a name that will help you identify the module, such as Frontpage Events.
- Change the Show Title option to Hide, then click on the Position drop-down list and select the bottom4 position under the gk_quark module positions; if the position is not visible in the list then you may write it into the Position field manually (use lower-case letters only).
- Open the Menu Assignment tab, then click on the drop-down list and select Only on the pages selected to see a list of available pages to assign the module to.
- If it isn't already marked, add a tick to the Main Menu → Home option, which points to the homepage. All other pages should be left unticked.
- Now we must configure the options that control the layout and content of the module. Configure each tab's options as per the image (further information on what settings need to be changed from default are written underneath): The Basic Settings Tab
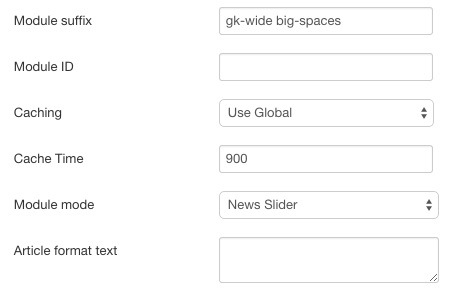
- In the Module suffix field, add the following text:
gk-wide big-spaces
- In the Module Mode drop-down list, select News Slider
- The Data Source Tab
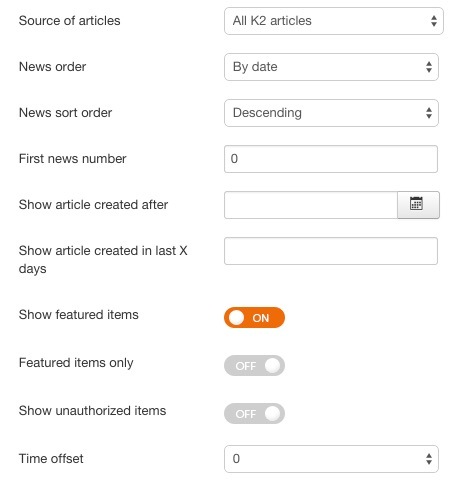
Leave all items as default except the Source of articles option; this should be changed to All K2 articles assuming your content uses K2, or your preferred items as per your available content.
- K2/Joomla! Additional Settings Tab
Leave this tab as default; no changes required.
- News Slider - Portal Mode Settings Tab
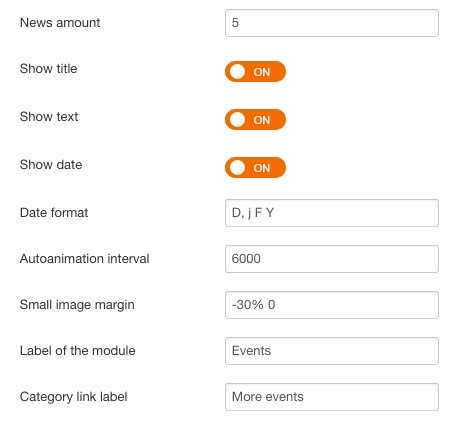
Change the Date Format field text to:
D, j F Y
Change Autoanimation Interval to 6000.
Set the Label of the module field to:
Events
Change the Category Link label to:
More Events
- Article Layout Tab
Leave this tab as default; no changes required.
- Thumbnails Tab
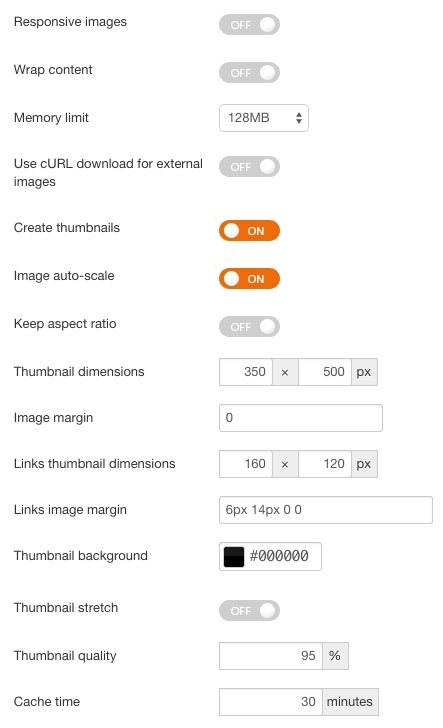
- Set Create Thumbnails to On.
- Set Thumbnail Dimensions to 350 x 500 px.
- Set Image Margin to 0.
- Animation Tab
Leave all options in this section as default.
- External Files Tab
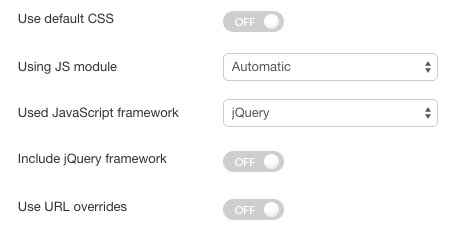
Set Use Default CSS to Off.
- Click Save & Close at the top of the screen to save the module. The testimonials are now configured.
- In the Module suffix field, add the following text:
Newsletter
It's important that you stay in touch with your clients and customers, and what better way to do it than via a newsletter. With this prepared form, you can have a clean, readable area ready for your chosen newsletter client.

To create this section:
- Open your Module Manager and click on New.
- Select a Custom HTML module from the list of available module types to be taken to the configuration screen.
- Enter a title of your choice; this will not be shown on the frontpage, so give it a name that will help you identify the module, such as Newsletter.
- In the text editor of the Custom HTML module, switch to the Plain Text Editor by clicking on the Toggle editor button; this is to prevent the editor from removing important HTML tags.
- Copy and paste the following HTML code into the body of the custom HTML module:
<form action="#"><small>Stay up-to-date with latest product</small> <input class="dark btn-border" type="submit" value="Subscribe" /> <input name="email" required="required" type="email" placeholder="Enter your e-mail..." /></form>
- Click on the Position drop-down list and select the bottom7 position under the gk_quark module positions.
- Click on the Menu Assignment tab at the top of the screen. You will see an option called Module Assignment with a drop-down list. Click on the drop-down list and select Only on the pages selected. You will see a list of available pages to assign the module to.
- If it isn't already marked, add a tick to the Main Menu → Home option, which points to the homepage. If you have already setup your About Us page, then this should also be ticked.
- Open the Advanced tab and add the following text into the Module Class Suffix field:
dark-bg newsletter small-spaces
- Click Save & Close at the top of the screen to save the module. The newsletter section is now ready.
Address Section
At the bottom of the frontpage is a small section that includes basic company contact details, including email, telephone number and address.

To create this section:
- Open your Module Manager and click on New.
- Select a Custom HTML module from the list of available module types to be taken to the configuration screen.
- Enter a title of your choice; this will not be shown on the frontpage, so give it a name that will help you identify the module, such as Contact Information.
- In the text editor of the Custom HTML module, switch to the Plain Text Editor by clicking on the Toggle editor button; this is to prevent the editor from removing important HTML tags.
- Copy and paste the following HTML code into the body of the custom HTML module:
<div class="gk-cols" data-cols="4">
<div class="col-width-40 col-t-width-50"><strong>Hours</strong>
<div class="gk-cols" data-cols="2">
<div>
<p>Monday - Friday <br />10.00am - 5.30am</p>
</div>
<div>
<p>Saturday - Sunday <br />12.00am - 10pm</p>
</div>
</div>
</div>
<div class="col-width-25  col-t-width-50"><strong>Location</strong>
<p>Quaking Row, Kensington, <br /> IN, 47699-9366, US</p>
</div>
<div class="col-width-20  col-t-width-50"><strong>Phone</strong>
<p>tel. 123.456.7890<br /> fax: 098.654,3211</p>
</div>
<div class="col-width-15  col-t-width-50"><strong>Connect with us</strong>
<p><a class="gk-social-link" href="#"> Twitter</a><br /> <a class="gk-social-link" href="#"> Facebook</a></p>
</div>
</div>
- Click on the Position drop-down list and select the bottom8 position under the gk_quark module positions.
- Click on the Menu Assignment tab at the top of the screen. You will see an option called Module Assignment with a drop-down list. Click on the drop-down list and select Only on the pages selected. You will see a list of available pages to assign the module to.
- If it isn't already marked, add a tick to the Main Menu → Home option, which points to the homepage. If you have already setup your About Us and Contact pages, then these should also be ticked.
- Open the Advanced tab and add the following text into the Module Class Suffix field:
small-spaces small-text
- Click Save & Close at the top of the screen to save the module. The contact section is now ready.
Special Pages
The special pages bundled with the base Quark package have been redesigned to match the warmer, rustic aesthetic of the restaurant restyle. These include:
- Contact Us - A form that utilizes modules at the top and bottom to create a unique header and provide contact and newsletter information, along with a contact form.
- Gallery Page - This page makes effective use of Photoswipe for a touch-friendly gallery interface that's perfect for showing off your photos.
- Error Page - Prepared and ready to go should users hit a bad link. Includes a Google site search field and links to homepage.
- Under Construction - A countdown page that highlights how long it will be until your website goes live; great for building anticipation and connecting with potential customers via social media in advance.
There are also two additional pages specific to Restaurant:
- Menu - Tantalize taste buds with a complete menu page that can advertise every aspect of your chef's work to tempt potential diners to make a reservation and sample the culinary delights your menu can provide.
- Reservation - A custom page that utilizes our reservation plugin to offer a complete contact form that includes party size and dining time, so you can accept dinner reservations online instantly.
Each of these pages is made in a slightly different way; some are made using only modules, whilst others are created using Custom HTML and CSS code. We'll look at creating each page in turn, assigning the modules and adding code where needed.
Contact Page
The contact page offers a quick and simple way for your clients to get all the information they need to get in touch with you, including links to Google Maps, a contact form, newsletter sign-up and additional contact information like email addresses, phone numbers and street addresses.

Page Structure
The contact page is an instance of a Single Contact page, which is assigned to the main menu for easy linking. The page itself is made up of three modules that create the header, newsletter and contact info blocks, with the standard Joomla! contact form in the middle.
Creating the Contact
The first thing to do is create a new contact, which will be used as the base menu item that creates the contact form and has the modules attached to it to create a page. To create this contact:
- Login to your Joomla! backend and click on Components → Contacts in the main menu to open the Contacts page.
- Click on New at the top of the screen to create a new contact; you'll be taken to the contact screen. Add a title into the title field such as Contact Us.
- Set the Featured option on the far-right of the screen to Yes, then click on the Miscellaneous Information tab.
- On this tab we can add additional data just as you would when creating a page. The content entered in this field will appear in the right-hand column of the contact page's mainbody. To match the demo, copy & paste the following text into the editor window:
<p>We are here to answer any questions you may have about our combadi experiences. Reach out to us and we'll respond as soon as we can.</p>
<p>Even if there is something you have always wanted to experience and can't find it on combadi, let us know and we promise we'll do our best to find it for you and send you there.</p>
<h3>Address</h3>
<p>6368 Rustic Berry Vista<br /> Goodwater, HI, 96728-6372, US</p>
<p><big>+1 808 132 05 80</big> <small>Open Monday to Saturday, 9.15am - 5.15pm</small></p>
- Click on the Display tab to show the options, and change the Street Address, City or Suburb, State or Country, Postal Code and Country fields to Hide.
- Click on Save & Close at the top of the screen to save the contact.
Assigning the Contact as a Menu Item
Now we need to assign the contact page to the main menu; this will make it easy for your users to find it, and will also allow us to add modules to the page.
To do this:
- In your Joomla! backend, click on Menus → Main Menu → Add New Item to go to the New Menu Item screen.
- Add a title to the Menu Title field, such as Contact. This name will be displayed in the main menu, so make it clear and understandable.
- In the Menu Item Type field, click on Select to see a list of types, then click on Contacts → Single Contact.
- A new Select Contact option and button will appear; click on Select to show a list of contacts; click on your Contact Us contact.
- Click on the Save & Close button at the top of the screen to save the menu item.
Now you have the contact, you have the menu link and right-column content; all that's left is to assign modules that provide the header, newsletter and basic address info, and the contact form.
Header Module
The header module is a unique header that uses the same layout as the Frontpage and About Us headers, but with the addition of a Google Maps link.
To create this section:
- Open your Module Manager and click on New.
- Select a Custom HTML module from the list of available module types to be taken to the configuration screen.
- Enter a title for the module to help you distinguish it from the others, such as Contact Header.
- Copy and paste the following HTML code into the body of the custom HTML module:
<p><img class="parallax-img" src="/images/docs/quark/joomla/install/demo/contact_bg.jpg" alt="" /></p> <div class="gkPage"> <h1 data-sr="enter bottom and move 50px">Get in touch with us</h1> <p data-sr="enter bottom and move 50px and wait .15s">This email address is being protected from spambots. You need JavaScript enabled to view it.</p> <div class="gk-social-icons-block" data-sr="enter bottom and move 50px and wait .3s"> </div> </div> <p><a class="gk-map-icon"> View on Google Maps</a></p> - Click on the Position drop-down list and select the header position under the gk_quark module positions.
- Open the Menu Assignment tab, then click on the drop-down list and select Only on the pages selected to see a list of available pages to assign the module to.
- Add a tick to the Contact Us page; ensure that all other pages including the homepage are unticked.
- Click Save & Close at the top of the screen to save the module.
Newsletter and Contact Information
These two modules make up the bottom area of the contact page and provide a sign-up field for a newsletter as well as general contact information for your company, including email, telephone and street address. As both of these modules were already created for the frontpage, all that is required is that they are assigned to the correct menu item so that they appear on the contact page.
To make these changes:
- Click on Extensions → Module Manager to open the list of modules. Find your Contact Information module.
- Click on the module to open the edit screen. Open the Menu Assignment tab and add a tick to your Contact Us page, then click Save & Close to save settings.
- Repeat these steps for both the Newsletter module too.
Assigning the Module Suffix
The Contact page contains some additional styling that needs to be set via the template options. To do so:
- Click on Menus → Main Menu in the top menu of your Joomla backend. You will see a list of assigned menu items.
- Note down the ID for your Contact menu item; this number may be found in the last column as in the below screenshot.
- Now click on Extensions → Template Manager → gk_quark → Features tab; you will see a list of options. We are interested in the Suffixes for pages option at the bottom.
- In the ItemID/Option field, enter the ID number for your Contact menu item, then in the Suffix field, type dark-bg, then click the Add Rule button.
- The dark-bg suffix will be added to your Homepage, and the correct CSS rules will be applied.
The Gallery Page
The gallery page utilizes the PhotoSwipe JavaScript Gallery to create touchscreen-friendly image gallery pages on your Quark-powered website. Users can zoom, drag, and swipe to manipulate the images for ultimate ease of use.
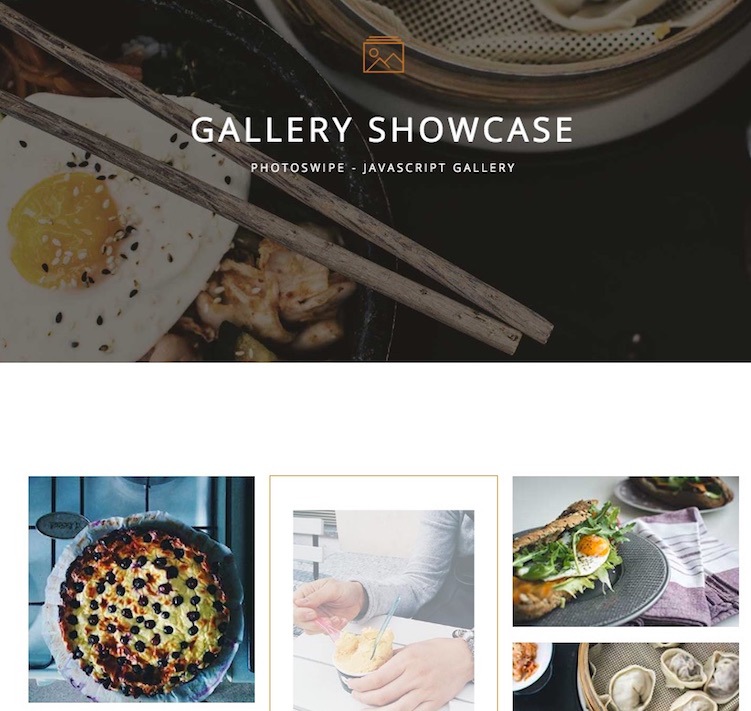
The Gallery page consists of two Custom HTML modules to create the header and mainbody content. Before we start, we'll need to create a blank Gallery page that can be used as a menu items and for assigning modules accordingly.
To do so:
- In the Joomla backend, click on Content → Article Manager → Add New Article.
- Add a title of your choice to the Title field; in the demo content this is called Gallery Showcase.
- Leave all other items (you may assign a category if required) and click Save & Close.
We now have a blank page ready to go.
Assigning the Menu Item
In order to apply modules to the page we will need to create a menu item using this page. To do so:
- In your Joomla! backend, click on Menus → Main Menu → Add New Item to go to the New Menu Item screen.
- Add a title to the Menu Title field, such as Gallery. This name will be displayed in the main menu, so make it clear and understandable.
- In the Menu Item Type field, click on Select to see a list of types, then click on Articles → Single Article.
- A new Select Article option and button will appear; click on Select to show a list of pages and click on your Gallery Showcase page.
- Click on the Save & Close button at the top of the screen to save the menu item.
Creating the Header
The Gallery page has a unique header created especially as in the demo content.
To create this header:
- Open your Module Manager and click on New.
- Select a Custom HTML module from the list of available module types to be taken to the configuration screen.
- Enter a title for the module to help you distinguish it from the others, such as Gallery Header.
- Copy and paste the following HTML code into the body of the custom HTML module:
<p><img class="parallax-img" src="/images/docs/quark/joomla/install/demo/header-gallery.jpg" alt="" /></p>
<div class="gkPage">
<h1 data-sr="enter bottom and move 50px">Gallery Showcase</h1>
<h2 data-sr="enter bottom and move 50px and wait .2s">PhotoSwipe - JavaScript Gallery</h2>
</div>
- Click on the Position drop-down list and select the header position under the gk_quark module positions; if the position is not visible in the list then you may write it into the Position field manually (use lower-case letters only).
- Open the Menu Assignment tab, then click on the drop-down list and select Only on the pages selected to see a list of available pages to assign the module to.
- Add a tick to the Gallery menu item; ensure that all other pages including the homepage are unticked.
- Click Save & Close at the top of the screen to save the module.
The Gallery Content
The gallery content itself is created using a Custom HTML module with special content to create the gallery layout.
To create this section:
- Open your Module Manager and click on New.
- Select a Custom HTML module from the list of available module types to be taken to the configuration screen.
- Enter a title for the module to help you distinguish it from the others, such as Contact Header.
- Copy and paste the following HTML code into the body of the custom HTML module:
<div class="gkPage">
<div class="gk-cols gk-gallery" data-cols="3">
<div><a href="/images/demo/gallery/image1.jpg" data-size="1280x1280" data-title="Carrot cake" data-desc="Lorem ipsum dolor sit amet, consectetur adipiscing elit. Proin consectetur dui at tempor elementum. Aenean convallis metus nec nibh varius hendrerit."><img src="/images/docs/quark/joomla/install/demo/gallery/thumb1.jpg" alt="Thumbnail I" width="334" height="334" /></a> <a href="/images/demo/gallery/image2.jpg" data-size="1280x853" data-title="Baked Cheltenham" data-desc="Lorem ipsum dolor sit amet, consectetur adipiscing elit. Proin consectetur dui at tempor elementum. Aenean convallis metus nec nibh varius hendrerit."><img src="/images/docs/quark/joomla/install/demo/gallery/thumb2.jpg" alt="Thumbnail II" width="335" height="224" /></a> <a href="/images/demo/gallery/image3.jpg" data-size="1164x872" data-title="Sauteed foie gras" data-desc="Lorem ipsum dolor sit amet, consectetur adipiscing elit. Proin consectetur dui at tempor elementum. Aenean convallis metus nec nibh varius hendrerit."><img src="/images/docs/quark/joomla/install/demo/gallery/thumb3.jpg" alt="Thumbnail III" width="335" height="251" /></a> <a href="/images/demo/gallery/image4.jpg" data-size="1280x853" data-title="Isle of Gigha" data-desc="Lorem ipsum dolor sit amet, consectetur adipiscing elit. Proin consectetur dui at tempor elementum. Aenean convallis metus nec nibh varius hendrerit."><img src="/images/docs/quark/joomla/install/demo/gallery/thumb4.jpg" alt="Thumbnail IV" width="335" height="224" /></a> <a href="/images/demo/gallery/image5.jpg" data-size="852x1280" data-title="crispy belly" data-desc="Lorem ipsum dolor sit amet, consectetur adipiscing elit. Proin consectetur dui at tempor elementum. Aenean convallis metus nec nibh varius hendrerit."><img src="/images/docs/quark/joomla/install/demo/gallery/thumb5.jpg" alt="Thumbnail V" width="335" height="504" /></a></div>
<div><a href="/images/demo/gallery/image6.jpg" data-size="853x1280" data-title="Cotswold lamb" data-desc="Lorem ipsum dolor sit amet, consectetur adipiscing elit. Proin consectetur dui at tempor elementum. Aenean convallis metus nec nibh varius hendrerit."><img src="/images/docs/quark/joomla/install/demo/gallery/thumb6.jpg" alt="Thumbnail VI" width="305" height="457" /></a> <a href="/images/demo/gallery/image7.jpg" data-size="1280x853" data-title="Roast pigeon" data-desc="Lorem ipsum dolor sit amet, consectetur adipiscing elit. Proin consectetur dui at tempor elementum. Aenean convallis metus nec nibh varius hendrerit."><img src="/images/docs/quark/joomla/install/demo/gallery/thumb7.jpg" alt="Thumbnail VII" width="305" height="203" /></a> <a href="/images/demo/gallery/image8.jpg" data-size="1280x853" data-title="Braised shank" data-desc="Lorem ipsum dolor sit amet, consectetur adipiscing elit. Proin consectetur dui at tempor elementum. Aenean convallis metus nec nibh varius hendrerit."><img src="/images/docs/quark/joomla/install/demo/gallery/thumb8.jpg" alt="Thumbnail VIII" width="305" height="204" /></a> <a href="/images/demo/gallery/image9.jpg" data-size="960x1280" data-title="Roasted loin" data-desc="Lorem ipsum dolor sit amet, consectetur adipiscing elit. Proin consectetur dui at tempor elementum. Aenean convallis metus nec nibh varius hendrerit."><img src="/images/docs/quark/joomla/install/demo/gallery/thumb9.jpg" alt="Thumbnail IX" width="305" height="406" /></a> <a href="/images/demo/gallery/image10.jpg" data-size="1280x853" data-title="Shellfish" data-desc="Lorem ipsum dolor sit amet, consectetur adipiscing elit. Proin consectetur dui at tempor elementum. Aenean convallis metus nec nibh varius hendrerit."><img src="/images/docs/quark/joomla/install/demo/gallery/thumb10.jpg" alt="Thumbnail X" width="305" height="203" /></a></div>
<div><a href="/images/demo/gallery/image11.jpg" data-size="1280x853" data-title="fennel and lovage" data-desc="Lorem ipsum dolor sit amet, consectetur adipiscing elit. Proin consectetur dui at tempor elementum. Aenean convallis metus nec nibh varius hendrerit."><img src="/images/docs/quark/joomla/install/demo/gallery/thumb11.jpg" alt="Thumbnail XI" width="297" height="198" /></a> <a href="/images/demo/gallery/image12.jpg" data-size="1155x1280" data-title="Atlantic king crab" data-desc="Lorem ipsum dolor sit amet, consectetur adipiscing elit. Proin consectetur dui at tempor elementum. Aenean convallis metus nec nibh varius hendrerit."><img src="/images/docs/quark/joomla/install/demo/gallery/thumb12.jpg" alt="Thumbnail XII" width="297" height="329" /></a> <a href="/images/demo/gallery/image13.jpg" data-size="873x1280" data-title="Sea beet" data-desc="Lorem ipsum dolor sit amet, consectetur adipiscing elit. Proin consectetur dui at tempor elementum. Aenean convallis metus nec nibh varius hendrerit."><img src="/images/docs/quark/joomla/install/demo/gallery/thumb13.jpg" alt="Thumbnail XIII" width="297" height="436" /></a> <a href="/images/demo/gallery/image14.jpg" data-size="1280x853" data-title="Morning coffee" data-desc="Lorem ipsum dolor sit amet, consectetur adipiscing elit. Proin consectetur dui at tempor elementum. Aenean convallis metus nec nibh varius hendrerit."><img src="/images/docs/quark/joomla/install/demo/gallery/thumb14.jpg" alt="Thumbnail XIV" width="297" height="199" /></a> <a href="/images/demo/gallery/image15.jpg" data-size="1280x848" data-title="Smoked duck" data-desc="Lorem ipsum dolor sit amet, consectetur adipiscing elit. Proin consectetur dui at tempor elementum. Aenean convallis metus nec nibh varius hendrerit."><img src="/images/docs/quark/joomla/install/demo/gallery/thumb15.jpg" alt="Thumbnail XV" width="297" height="196" /></a></div>
</div>
</div>
- Click on the Position drop-down list and select the mainbody position under the gk_quark module positions; if the position is not visible in the list then you may write it into the Position field manually (use lower-case letters only). Change the Show Title option to Hide.
- Open the Menu Assignment tab, then click on the drop-down list and select Only on the pages selected to see a list of available pages to assign the module to.
- Add a tick to the Gallery menu item; ensure that all other pages including the homepage are unticked.
- Click Save & Close at the top of the screen to save the module.
Your gallery page is now ready.
The Blog Section
The blog section as seen in the live demo is very simple to create, and relies on articles written in the K2 extension as its base. To utilize the layout you will need to take a few minor steps:
- Create a category in which to store your blog articles in K2 and configure the settings.
- Create a Menu Item for the category.
Then each article added to this K2 category will appear in the blog section automatically. Let's look at each step in more detail:
Create a Category
You should create at least one category for your blog section, as the layout relies on pulling new articles from a selected category to function. Alternatively, you may prefer to have a main Blog category with several sub-categories covering different blogging areas, like News, Latest Dishes etc...
To create a new category:
- Click on Components → K2 → Categories in the Joomla backend menu to open the category list; this will be blank unless you have pre-existing categories in your content.
- Click on the green New button at the top of the screen to create a new category.
- Enter a Title for your blog at a minimum; if you wish you may add additional content to be displayed in the header area of the blog page, but this is not necessary.
- On the right sidebar of the category page are a set of options; configure these options as per the following description:
- Category Item Layout Section
In the Select a Template drop-down list, choose restaurant.
- Layout Grid Section
Change Leading Count option to 3.
Change Image Size for Leading Items to Small.
Change Primary Count to 3.
Change Columns for Primary to 1.
Change Image Size for Primary Items to Small.
Change Secondary Count to 3.
Change Links Count to 3.
Change Image Size for Link Items to Small.
- Other Layout Options Section
Leave this section as default.
- Category View Options
Change the Item Counter (next to sub-category title) option under the Sub-category handling sub-section to Hide.
- Item Image Options
Leave blank as with the default settings.
- Item View Options in Category Listings
Change the Author option to Hide.
Change the Anchor Link (with comments counter) to item's comment form option to Hide.
- Item View Options
Change the Font Resizer, Print Button, Email Button, Social Button, Anchor Link to Video and Anchor Link to Image Gallery options to Hide.
Change the Rating option to Hide.
Change the Extra Fields, Item Modified Date & Time and Hits options to Hide.
Change the Attachments, Attachments Counter and Media options to Hide.
Change the Media Credits, Image Gallery and Item Navigation options to Hide.
Change the Display Extended Author Info, Author Description, Author URL, Author Email and Latest Items From Author options Hide.
Change the Related Items and Related Item Title options to Hide.
- Metadata Information
Leave blank as with the default settings.
- Category Item Layout Section
- Click Save & Close to save changes.
Now we can create the menu item for this category.
Creating the Menu Item
- Click on Menus → Main Menu → Add New Menu Item in your Joomla backend, and add a name for your menu item to the Menu Title field.
- Click on the Select button in the Menu Item Type field, and select K2 → Categories.
- Click on the Options tab, then click on the Select Categories field to see a drop-down list of your K2 categories; pick your blog category.
- Click on Save & Close to save changes.
Your menu item is ready to go; now anyone clicking on that item will be taken to your list of blog articles, with the latest ones from your chosen category showing first.
Menu Page
The menu page can contain some or all of your dishes, drinks and desserts as you see fit, with elegant layouts that capture the dining atmosphere of your establishment.
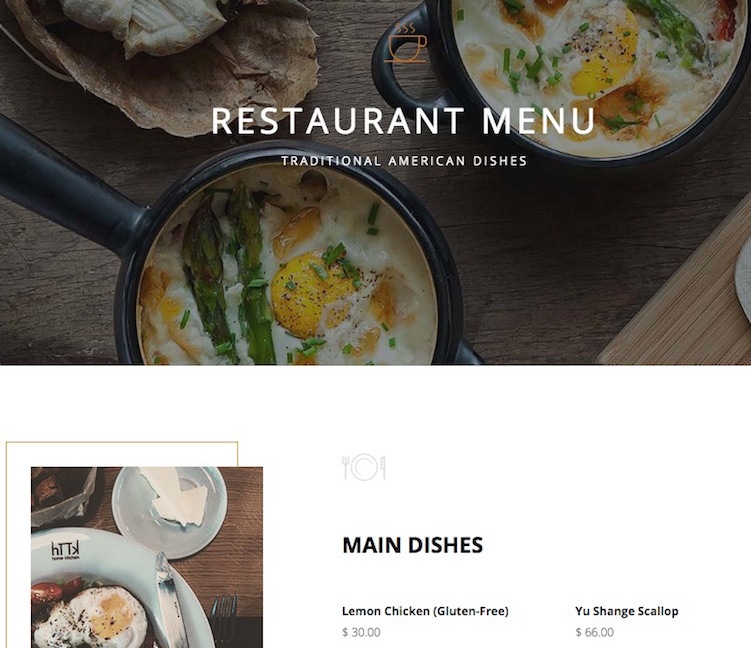
The menu Page consists of a standard Joomla! article with a custom HTML and CSS code to create the styling.
To create this page, follow these steps:
- In your Joomla! backend, click on Content → Article Manager to open your list of articles, then click on New to create a new page.
- Set the Title as you see fit, such as Our Menu.
- Copy the following HTML code into the mainbody of the page:
<div class="gk-cols" data-cols="2"> <div class="col-width-40"><span class="gk-image-border gk-left gk-border-anim" data-sr="enter bottom and move 50px and wait 0.01s"><img src="/images/docs/quark/joomla/install/demo/restaurant-style/menu_image.jpg" alt="Main dishes" /></span></div> <div class="gk-menu col-width-60"> <h3>Main Dishes</h3> <div class="gk-cols" data-cols="2"> <div> <dl> <dt>Lemon Chicken (Gluten-Free)</dt> <dd>$ 30.00</dd> <dt>Sweet & Sour Chicken</dt> <dd>$ 25.00</dd> <dt>Stir Fried Teriyaki Chicken</dt> <dd>$ 80.00</dd> <dt>Basil Shrimp</dt> <dd>$ 45.00</dd> <dt>Yu Shange Scallop</dt> <dd>$ 66.00</dd> <dt>Basil Shrimp</dt> <dd>$ 45.00</dd> <dt>Yu Shange Scallop</dt> <dd>$ 66.00</dd> </dl> </div> <div> <dl> <dt>Yu Shange Scallop</dt> <dd>$ 66.00</dd> <dt>Lemon Chicken</dt> <dd>$ 30.00</dd> <dt>Sweet & Sour Chicken</dt> <dd>$ 25.00</dd> <dt>Basil Shrimp</dt> <dd>$ 45.00</dd> <dt>Stir Fried Teriyaki Chicken</dt> <dd>$ 80.00</dd> <dt>Basil Shrimp</dt> <dd>$ 45.00</dd> <dt>Yu Shange Scallop</dt> <dd>$ 66.00</dd> </dl> </div> </div> </div> </div> <div class="gk-cols" data-cols="2"> <div class="gk-menu col-width-60"> <h3>Desserts</h3> <div class="gk-cols" data-cols="2"> <div> <dl> <dt>Lemon Chicken (Gluten-Free)</dt> <dd>$ 30.00</dd> <dt>Sweet & Sour Chicken</dt> <dd>$ 25.00</dd> <dt>Stir Fried Teriyaki Chicken</dt> <dd>$ 80.00</dd> <dt>Basil Shrimp</dt> <dd>$ 45.00</dd> <dt>Yu Shange Scallop</dt> <dd>$ 66.00</dd> <dt>Basil Shrimp</dt> <dd>$ 45.00</dd> <dt>Yu Shange Scallop</dt> <dd>$ 66.00</dd> </dl> </div> <div> <dl> <dt>Yu Shange Scallop</dt> <dd>$ 66.00</dd> <dt>Lemon Chicken</dt> <dd>$ 30.00</dd> <dt>Sweet & Sour Chicken</dt> <dd>$ 25.00</dd> <dt>Basil Shrimp</dt> <dd>$ 45.00</dd> <dt>Stir Fried Teriyaki Chicken</dt> <dd>$ 80.00</dd> <dt>Basil Shrimp</dt> <dd>$ 45.00</dd> <dt>Yu Shange Scallop</dt> <dd>$ 66.00</dd> </dl> </div> </div> </div> <div class="col-width-40"><span class="gk-image-border gk-right gk-border-anim" data-sr="enter bottom and move 50px and wait 0.01s"><img src="/images/docs/quark/joomla/install/demo/restaurant-style/menu-desserts.jpg" alt="Desserts" /></span></div> </div> <div class="gk-cols" data-cols="2"> <div class="col-width-40"><span class="gk-image-border gk-left gk-border-anim" data-sr="enter bottom and move 50px and wait 0.01s"><img src="/images/docs/quark/joomla/install/demo/restaurant-style/menu-drinks.jpg" alt="Drinks" /></span></div> <div class="gk-menu col-width-60"> <h3>Drinks</h3> <div class="gk-cols" data-cols="2"> <div> <dl> <dt>Lemon Chicken (Gluten-Free)</dt> <dd>$ 30.00</dd> <dt>Sweet & Sour Chicken</dt> <dd>$ 25.00</dd> <dt>Stir Fried Teriyaki Chicken</dt> <dd>$ 80.00</dd> <dt>Basil Shrimp</dt> <dd>$ 45.00</dd> <dt>Yu Shange Scallop</dt> <dd>$ 66.00</dd> <dt>Basil Shrimp</dt> <dd>$ 45.00</dd> <dt>Yu Shange Scallop</dt> <dd>$ 66.00</dd> </dl> </div> <div> <dl> <dt>Yu Shange Scallop</dt> <dd>$ 66.00</dd> <dt>Lemon Chicken</dt> <dd>$ 30.00</dd> <dt>Sweet & Sour Chicken</dt> <dd>$ 25.00</dd> <dt>Basil Shrimp</dt> <dd>$ 45.00</dd> <dt>Stir Fried Teriyaki Chicken</dt> <dd>$ 80.00</dd> <dt>Basil Shrimp</dt> <dd>$ 45.00</dd> <dt>Yu Shange Scallop</dt> <dd>$ 66.00</dd> </dl> </div> </div> </div> </div>
- Click on the Options tab at the top of the screen to go the options menu. Set all options except Show Title, Linked Titles, Show Intro Text, Position of Article Info and Positioning of the Links to No or Hide
- Click on Save & Close at the top of the screen to save the page.
Assigning the Menu Item
We now need to assign this page to a menu item so that we may assign modules specifically to it. To do so:
- In your Joomla! backend, click on Menus → Main Menu → Add New Item to go to the New Menu Item screen.
- Add a title to the Menu Title field, such as Menu. This name will be displayed in the main menu, so make it clear and understandable.
- In the Menu Item Type field, click on Select to see a list of types, then click on Articles → Single Article.
- A new Select Article option and button will appear; click on Select to show a list of pages and click on your Menu page.
- Click on the Save & Close button at the top of the screen to save the menu item.
Creating the Header
The Menu page boasts a unique header that uses the same layout as the Frontpage headers, but with a simple title and subtitle without the bells and whistles to draw more attention to your food.
To create this section:
- Open your Module Manager and click on New.
- Select a Custom HTML module from the list of available module types to be taken to the configuration screen.
- Enter a title for the module to help you distinguish it from the others, such as Menu Header.
- Copy and paste the following HTML code into the body of the custom HTML module:
<p><img class="parallax-img" src="/images/docs/quark/joomla/install/demo/restaurant-style/header-menu.jpg" alt="" /></p>
<div class="gkPage">
<h1 data-sr="enter bottom and move 50px">Restaurant Menu</h1>
<p data-sr="enter bottom and move 50px and wait .2s">Traditional American dishes</p>
</div>
- Click on the Position drop-down list and select the header position under the gk_quark module positions; if the position is not visible in the list then you may write it into the Position field manually (use lower-case letters only).
- Open the Menu Assignment tab, then click on the drop-down list and select Only on the pages selected to see a list of available pages to assign the module to.
- Add a tick to the Menu page; ensure that all other pages including the homepage are unticked.
- Click Save & Close at the top of the screen to save the module.
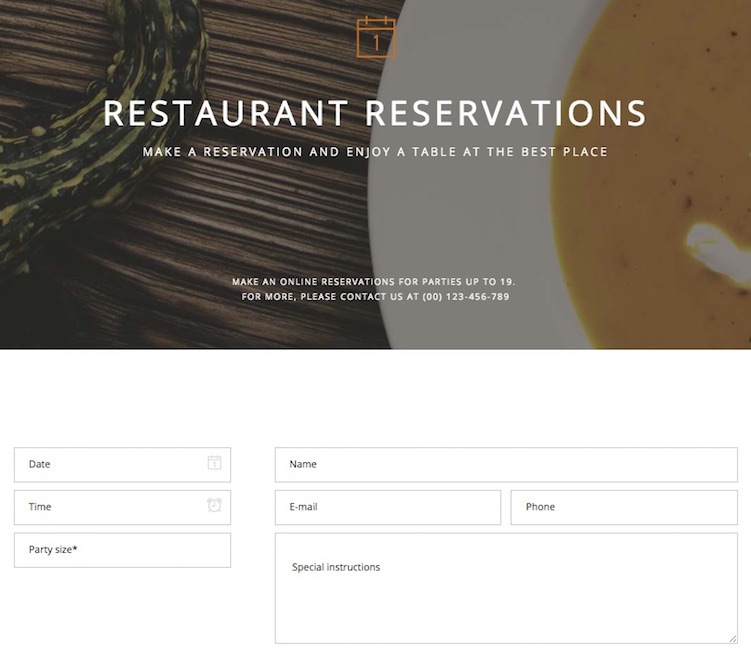
Reservation Page
The reservation page offers an alternative means to reserve a table at your restaurant, with specific options covering the required information such as party size and booking time. The reservation form is created with our GK Reservation plugin, which is already configured on install. So all we need to do is create a page and display the plugin in the mainbody content. As with the other pages we will also add a header section to complement the first impression the page gives.
Configuring the Plugin
The installation and activation of the GK Reservation plugin was covered in the initial installation, however if you wish to control which fields are displayed in the form you may do so by clicking on Extensions → Plugin Manager in your Joomla backend to open the list of available plugins, and searching for the GK Reservation plugin. Open the settings and click on the Form tab to configure which fields are displayed, and the Mail configuration tab to change where emails sent via the form are delivered (this defaults to the admin email address).
Creating the Page
To create the base page for reservations, follow these steps:
- In your Joomla! backend, click on Content → Article Manager to open your list of articles, then click on New to create a new page.
- Set the Title as you see fit, such as Reservations.
- Add the following text to the mainbody of your page content:
{GKRESERVATION}This will create an instance of the reservation plugin. - Click on the Options tab at the top of the screen and change all options on the page except the Show Intro Text, Position of Article Info and Positioning of the Links options to No or Hide, as in the below image:
- Click on Save & Close at the top of the screen to save the page.
Now we can assign it to the main menu, and then create the header module.
Assigning the Menu Item
- In your Joomla! backend, click on Menus → Main Menu → Add New Item to go to the New Menu Item screen.
- Add a title to the Menu Title field, such as Reservations. This name will be displayed in the main menu, so make it clear and understandable.
- In the Menu Item Type field, click on Select to see a list of types, then click on Articles → Single Article.
- A new Select Article option and button will appear; click on Select to show a list of pages and click on your Reservation page.
- Click on the Save & Close button at the top of the screen to save the menu item.
Creating the Header
As with our other additional pages, the Reservation section has a unique header with alternative text and extra info for large group reservations.
To create this section:
- Open your Module Manager and click on New.
- Select a Custom HTML module from the list of available module types to be taken to the configuration screen.
- Enter a title for the module to help you distinguish it from the others, such as Menu Header.
- Copy and paste the following HTML code into the body of the custom HTML module:
<p><img class="parallax-img" src="/images/docs/quark/joomla/install/demo/restaurant-style/header-reservations.jpg" alt="" /></p>
<div class="gkPage">
<h1 data-sr="enter bottom and move 50px">Restaurant reservations</h1>
<p data-sr="enter bottom and move 50px and wait .2s">Make a reservation and enjoy a table at the best place</p>
</div>
<p><sub> Make an online reservations for parties up to 19. <br /> For more, please contact us at (00) 123-456-789 </sub></p>
- Click on the Position drop-down list and select the header position under the gk_quark module positions; if the position is not visible in the list then you may write it into the Position field manually (use lower-case letters only).
- Open the Menu Assignment tab, then click on the drop-down list and select Only on the pages selected to see a list of available pages to assign the module to.
- Add a tick to the Reservation page; ensure that all other pages including the homepage are unticked.
- Click Save & Close at the top of the screen to save the module.
Setup Menus
Throughout this installation guide we have repeatedly added items to the Main Menu as needed, but there are also some additional menus that need to be setup and assigned to modules, including the Footer Menu that appears at the bottom of every page:
And the User Menu, which provides user-specific options when logged-in.
Both of these menus should be manually created and assigned to a position via a module; this part of the tutorial will cover creating the placeholders for the menu to match the demo content.
Footer Menu
At the bottom of the frontpage and many other pages is a simple menu that can be used for secondary links like terms & conditions or other items that do not need to be as visible, or quick links to common resources.

To create the Footer Menu:
- In your Joomla backend, click on Menus → Menu Manager → Add New Menu to be taken to the Menu Details screen.
- Enter a name for your menu; in the demo content we used Footer Menu. Now enter a Menu Type; this is the name the system will use to identify the menu. For clarity, keep it simple, lower-case and without symbols or spaces. In the demo content we used footmenu. Enter a description if you wish.
- Click on Save & Close to save the changes. You will be taken back to Menu list; now we need to add menu items to the Footer menu.
- Click on Menus → Footer menu → Add New Menu Item to go to the Edit Menu Item screen.
- In the Title field, type Home. Click on the Select button in the Menu Item Type field and select External URL.
- Click Save & Close to save changes.
- Repeat step 4 to create a new menu item, but this time give it the name News and assign the Category List menu item type. In the Choose a category option pick your Blog category; we'll change this later if necessary.
- Repeat steps 4 through 6 three more times to create three new external URL menu items; name them Partners, Support and Contact Us accordingly.
The Footer menu is now ready, and we can create the user menu.
User Menu
The user menu provides all the options for users to manage their profile when logged-in.
To create this menu:
- In your Joomla backend, click on Menus → Menu Manager → Add New Menu to be taken to the Menu Details screen.
- Enter User Menu as the title, and mainemu as the Menu Type.
- Click on Save & Close to save the changes. You will be taken back to Menu list; now to add items.
- Click on Menus → User menu → Add New Menu Item to go to the Edit Menu Item screen.
- In the Title field, type Your Profile. Click on the Select button in the Menu Item Type field and select Users Manager → User Profile.
- Change the Access option on the right-hand side to Registered, then click Save & Close to save changes.
- Repeat steps 4 through 6, but this time name the menu item Edit Profile, and in the Menu Item Type field select Users Manager → Edit User Profile.
- Repeat step 4 to create a new item; type Create Article in the title field and select the Articles → Create Article menu item type before saving.
- Repeat step 4 to create a new item; type Submit a Web Link in the title field and select the Weblinks → Submit a Web Link menu item type before saving.
Make sure that each of these menu items are limited to access from registered users only to prevent issues. The User menu is now ready, and we can assign these menus to their proper positions.
Assigning the Menus
Now we have the menus, we just need to tell Joomla where it should display them. To do so:
- Click on Extensions → Module Manager in the main menu of your Joomla backend. To go to the list of modules.
- Click on the green New button at the top of the screen to start creating a new module.
- In the list of available module types, click on Menu. You will be taken to the module edit screen; enter Footer Menu in the Title field.
- In the Select Menu field, choose your Footer Menu, and change the Show Sub-menu Items to No.
- In the Position field on the right-hand side, select the footer_nav position, then click Save & Close to save the changes.
- Repeat steps 2 and 3 to create a new menu module, but this time enter User area as the title.
- In the Select Menu field, choose your User Menu from the list, but leave the Show Sub-menu Items as the default Yes.
- In the Position field, select the usermenu position, then click Save & Close to save the module.
Now there is one final step; creating the Social Icons that appear in the main menu under the menu links.
Main Menu Modules
With the menus created and assigned, the last thing to do is add the custom HTML module that creates the Social Media Icons that appear directly under the options in the main menu:
![]()
To create this section:
- Open your Module Manager and click on New.
- Select a Custom HTML module from the list of available module types to be taken to the configuration screen.
- Enter a title for the module to help you distinguish it from the others, such as Menu bottom.
- Copy and paste the following HTML code into the body of the custom HTML module:
<div class="gk-social-icons">
<a href="#"><i class="gkicon-fb"></i></a>
<a href="#"><i class="gkicon-twitter"></i></a>
<a href="#"><i class="gkicon-gplus"></i></a>
<a href="#"><i class="gkicon-pinterest"></i></a>
<a href="#"><i class="gkicon-behance"></i></a>
<a href="#"><i class="gkicon-dribbble"></i></a>
<a href="#"><i class="gkicon-instagram"></i></a>
<a href="#"><i class="gkicon-rss"></i></a>
<a href="#"><i class="gkicon-youtube"></i></a>
<a href="#"><i class="gkicon-vimeo"></i></a>
<a href="#"><i class="gkicon-linkedin"></i></a>
</div>
- Click on the Position drop-down list and select the menu_bottom position under the gk_quark module positions.
- Click Save & Close at the top of the screen to save the module.
And that's it; all modules, menus and pages are assigned and created, and your site should now match the demo layout, ready to be customized.