Learn how you can safely add custom CSS rules in our WordPress themes
Virtually all WordPress users save absolute beginners have at least heard of CSS (Cascading Style Sheets). The name doesn’t really give anything away, but CSS is one of the core components of any good website, not just those based on WordPress. It allows for plain, boring old HTML elements to be styled and expanded to create totally new visually-appealing effects, from basic color and font changes through to animations and other technical additions. Though most themes including our own will use a multitude of solutions to provide the best content possible, such as JavaScript and PHP, CSS will still be at the core of the theme as it creates the core layout and styling.
Given the essential nature of CSS to the overall look of a theme, it’s going to be your first port of call once you decide to start adding your own stylization via custom CSS rules. Sure, you can adjust several core elements via the theme options; our modern themes utilize the WordPress Customizer to allow for many core options, such as colors, fonts and other visual effects to give you a huge amount of control of your site’s look without having to dip your toes into the complexities of CSS, but at some point you’ll want to go a step further and really add your stamp to your site design. When that time comes, you’ll need to make sure you know exactly how and where to apply your CSS changes so you can avoid common pitfalls that threaten the adventurous; you’re not going to be very happy if the entirety of your site’s sublime looks are destroyed with a poorly-timed bit of CSS tomfoolery! Thankfully, this article is on hand to show you the steps you’ll need to follow to safely apply your own CSS rules to our themes without making a huge mess of things.
Getting to Know How CSS Works
So why’s it called Cascading Style Sheets? This actually refers to the way CSS decides which particular rules to apply. With your basic CSS you can, for example, change the color of a piece of text, or create a text block and align it to one side of the screen. This is fine when you’ve only got one or two HTML tags to style, but what happens when you’ve got loads of different tags? This is where the “cascading” part of CSS comes into play; it refers to how CSS decides which rules should be applied. Basically, this translates as “the more general the rule, the less importance it has”. For example, if I have a single rule for all paragraph tags, but then I have another contradictory rule specifically for paragraph tags in a div element, then that rule will be applied over the more general rule where applicable i.e. if a paragraph is in a div element, then the more specific rule will be applied over the more general rule. There’s a lot of nuance to how rules are applied and overridden, but that’s the core of the concept.
As you can imagine, most WordPress themes are very complex, with a huge amount of stylized elements that requires a large amount of CSS code, not to mention the other complexities thrown up by things such as responsive design which requires a lot of additional CSS to work properly. In fact, in our themes you will find several CSS files. Usually the main core file is called style.css, and this contains the general CSS rules for the theme. However, you’ll find a lot more CSS files that cover additional functionalities and device-specific elements; an ie9.css file that provides fixes for elements that won’t natively display correctly in Internet Explorer 9, or a tablet.css file that reconfigures the layout to suit smaller tablet device screens rather than desktops. This can make it much harder to make modifications of your own comfortably, without affecting other elements. Thankfully though, both the developers or WordPress and our own in-house development team recognized the potential issues and have created multiple ways for you to safely add and experiment with your own CSS code without damaging the core files. Let’s look at these options now.
Child Themes
The core WordPress functionality includes a helpful bit of redundancy to help you make or test changes to your theme’s files without actually modifying the originals. This is all achieved via Child Themes, which are essentially copies of your existing theme that take all their core data from the original theme files, but any changes you make to the child theme’s version of the files will only affect the child theme, not the core file that it’s copied from. This is an extremely safe way to make changes to the CSS, but the process of creating the child theme might be a bit daunting for newcomers, and if you’re only making a few minor changes to your CSS code there are simpler ways to achieve it. Still, if you think a child theme is the way to go for your CSS modification needs, you’ll find a helpful guide on creating child themes on our blog.
The override.css file
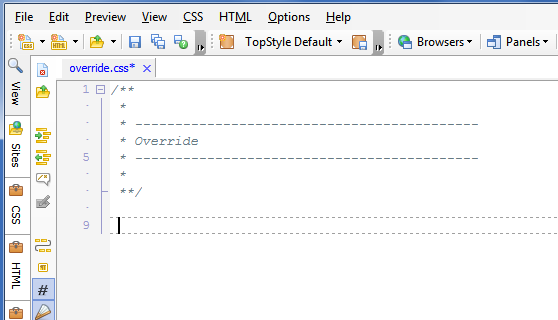
If child themes are a bit too much for your liking, then our theme developers have created an alternative way to modify CSS without any risks; the override.css. How does it work? Well, as discussed earlier CSS applies rules according to the importance assigned to them; rules assigned to specific classes have much more clout in CSS terms than a general rule. What the override.css file does is assign any CSS code added to it a very high level of importance in the CSS hierarchy, which means that its rules will be applied last in any page rendering, essentially ‘overriding’ the existing CSS code, hence the file name. In order to make use of this file all you’ll need is an FTP connection to your server so you can retrieve the override.css file and upload the modified file once you’ve added your CSS changes; if you’re not too familiar our blog includes an introduction to FTP for beginners that will help you get started. Also, though you can modify CSS files in Notepad it’s recommended that you download and install a CSS or web-development-specific editor for easier editing, such as Sublime Text.
How can you make use of this file? There is a slight difference in the steps required depending on what type of GavickPro WordPress theme you are using. Our earlier releases relied on the powerful features of the GavernWP framework, whereas our more modern releases utilize the WordPress Customizer for its theme options. We’ll examine both options here so you’ll be covered no matter which of our themes you decide to use on your site.
Override.css in our modern WordPress themes
In our more recent themes the override.css file is enabled by default; all you need to do is make your modifications to the file and they will be applied automatically. The method for this is simple; assuming the theme is already installed and your site configured:
- Connect to your website’s server via your preferred FTP program.
- Once connected, navigate to the wp-content → themes → theme-name → css folder of your WordPress installation, where theme-name is the name of your theme; each theme that you install will have its own folder in the themes folder.
- Inside the css folder you’ll find the override.css file; use your FTP program to download it to your local machine.
- Now you can open the file in your editor of choice and add your own CSS rules; once finished, save the changes.
- Nearly there! Now all that’s left to do is connect to your server via FTP once again and upload the modified override.css back to its original location.
Now your new CSS rules will be applied automatically on your site and you can see how it looks!
Override.css in our GavernWP themes
Our earlier WordPress use the powerful GavernWP framework as a base. Unlike our newer themes the GavernWP framework offered its WordPress settings in its own section of the dashboard, with many flexible options ready to be modified. Of course, since we’re looking to modify the CSS in this case these additional options are not necessary in this instance. However, there is one option we need to be take care of; the override.css file is disabled by default in standard GavernWP installations, so even though you can download and modify the file the changes will not be applied until the file is enabled in the theme settings.
- Before making changes, you’ll have to enable the override feature in your GK Theme.
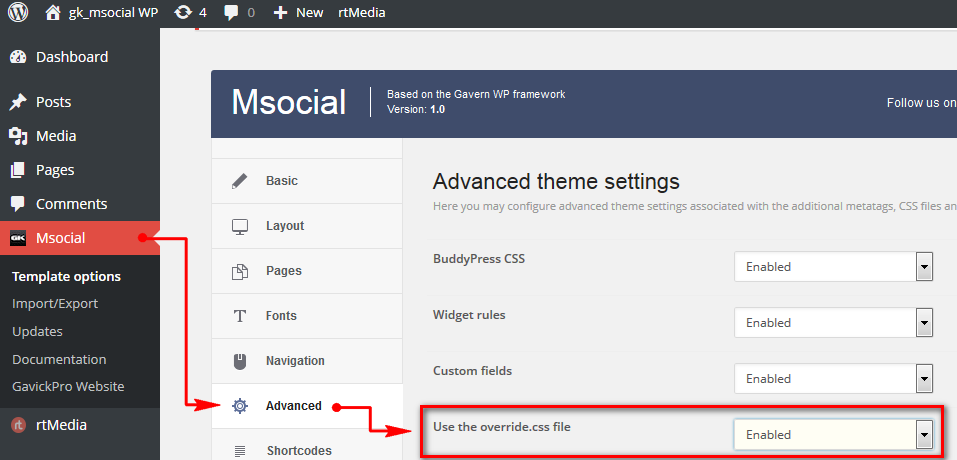
From your WordPress backend: go to: GK Theme Name –> Template options –> Advanced –> Use the override.css file [Enabled] + click the Save changes button.
This enables the override.css file for use, so any changes added to the file will be applied to your site, overriding any existing rules if necessary.
- Now you can start modification; as with the modern themes you should now connect to your server via FTP and navigate to the wp-content\themes\gk_TemplateName\css folder of your WordPress installation.
- Download the override.css file to your local computer, and open it with whatever editing program you prefer. Now you can add new CSS rules as you see fit.
- Finally, save your changes and connect to your server via FTP once again, and upload the modified override.css file to its original location in the css folder of your theme.
Your changes will now be applied, and if you should need to add more CSS rules you can simply make your changes and reupload the modified file.
Bonus; modifying CSS without using FTP
FTP is often a core function for intermediate use of WordPress, as many of the more interesting changes to CSS or other theme code requires access to the core files of the theme. However, if you’re really uncomfortable with creating a child theme or fiddling around with your theme’s files via FTP, then luckily there are plugins available that will help you to modify your CSS files directly in your WordPress backend. Want to know more? Check out this helpful Blog Post for details of a few plugins that will help you keep all your changes in the dashboard, with no FTP or other server manipulation required!
How to find which CSS lines I have to override?
You’ve got the solution for adding your own CSS rules to the theme, but how do you know what elements you need to target to achieve the desired effect? Ultimately, this is a question of practice makes perfect; after editing CSS for a while you’ll start to understand the format used, and it will become easier to figure out where your changes need to be. However, in the meantime it’s worth bearing these hints in mind to help you get moving:
First off, if you’re going to modify an element you need to be able to identify its ID or Class, which will be needed when targeting your CSS rules. There’s some simple ways to do this with your browser, whether via built-in functionality or options added via plugins.
- If you’re using Google Chrome, then you’re already set. Simply right-click on the element you wish to modify on the webpage and select “Inspect Element” from the list; this will bring up the source for the page that will help you identify the element and modify the existing CSS; a very useful way to test changes before you apply them. Naturally, it goes without saying that you should have some basic knowledge of CSS selectors and classes and how they can be used to apply CSS rules; make sure you’ve got a grounding before trying to make changes otherwise you’ll hit many frustrating skillwalls. More info on Chrome’s functions may be found in this manual.
- The Firebug tool is also very helpful when inspecting HTML elements and CSS properties (you can see how it works on youtube). If you try to set a style rule for something that doesn’t exist in the template’s style, you will not see any changes. If you want to read more about making CSS changes, head over to this documentation post for an introduction.
If you’re intending to use the “!important” tag at the end of your CSS properties to make sure your changes override other files make sure to read these tips first to help you get to grips with how browsers figure out which CSS rule trumps which.
Conclusion
You can modify your WordPress design without creating a child theme or editing the function file, but proper care must always be a factor when making any changes to keep your site running smoothly. Mastering CSS will enhance your skills as a beginner designer and will help ensure your work as a web design professional is effective and practical. Just remember that everyone starts somewhere, and there are a multitude of options for adding your own CSS and getting started. If possible, you can always try installing a local version of one of our themes using the quickstart and a program like XAMPP; this way you can make modifications without fear of causing any lasting damage to your site, plus you get the benefit of avoiding any FTPing when you’re working locally! In no time at all you’ll find modifying the files second nature, and you can start making your sites even more unique.
This article was first published
