WordPress Theme Developers generally have a good eye for style, and will do their best to keep their themes looking eye-catching yet intuitive. However, even with the attention to detail provided by experience, it’s inevitable that customers are going to want to do their own thing and add their personal stamp to a project. Our themes include a great many options for adding your own style, but if you want to really make a difference then very often you’ll need to get your hands dirty with some custom CSS.
In our themes we usually add an additional file to the package called override.css. It does just as its name suggests; if the override option in the theme is enabled then any CSS rules that are added to this file will be loaded after the main theme CSS files, overriding existing rules where necessary. This is a convenient way to keep your CSS changes all wrapped up in one place, without modifying the core theme CSS files. It’s also very useful when updating a theme; rather than reapplying CSS changes after an update you can just save a backup of the override file and restore it once the update is complete.
If you are using the popular JetPack plugin, there's another, even easier option for making CSS changes that removes the need to connect to your server via SFTP(FTP) to download, edit and reupload files. Instead, you can do everything in the WordPress dashboard. It’s a very convenient option, but not everyone installs the JetPack plugin since it includes a lot of modules that cover a range of needs that can be overwhelming or unnecessary. Thankfully, there is another alternative if you want this functionality without installing JetPack; a plugin called: JP Custom CSS.
This plugin keeps our Custom CSS completely separated from the theme, so it’s a good solution if making CSS changes is something you find yourself getting into often. Additionally, for the experts out there, you can use CSS Preprocessors, like LESS or Sass and use the Add-On CSS working mode, which is of course recommended, or replace the default style.css file completely (this option really should only be used by advanced users and only with our new themes that don’t rely on our GavernWP Framework).
Hot to use the JP Custom CSS plugin?
If you want to give this plugin a try, head on over to your Dashboard → Plugins section, click the Add New button and type jp custom css in the search field to find and install the plugin. After installing and activating the plugin you’ll find an additional tab in your Dashboard → Appearance section called Edit CSS.
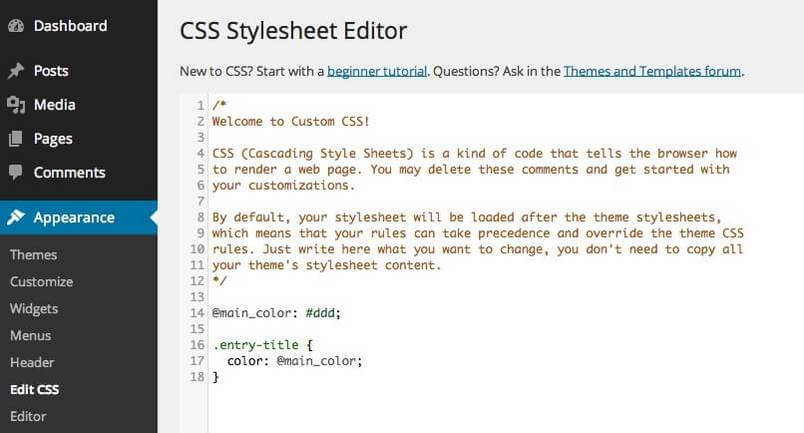
Here you can add your own Custom CSS. (in the right column you may find options such as css preprocessors used, working mode or content width – useful for full-size images, videos etc…).
There's one more advantage to using this kind of plugin that’s similar to the benefits when editing WordPress posts or pages; you can add your custom CSS and preview the changes before publishing. When you click the Preview button, a new browser window/tab will open allowing you to view your website with the custom CSS code applied. You will see a message at the top of your blog, "Changes must be saved or they will be lost". Once we're sure that the changes are correct we can click the Save Stylesheet button. It’s a great way to make changes without things getting messy, and particularly good for beginners who aren’t confident that their changes will get the results they need.