Recently, I described the creation process of a simple calendar control as a basic introduction to the idea. This time, I’d like to focus on describing a more advanced control that can be used to create a list of categories which can then be manipulated and styled independently of the other categories.

Such control is perfect when we want to, for example, apply a new layout to specific blog categories that deal with different subjects. In addition, we’ll also cover how to create controls that use multiple form fields within a single control.
Multiple fields within a single control
The basic problem is with storing data. Our control will sometimes have multiple fields, even perhaps a few dozen as a checkbox type (depending on the number of categories on the user’s page). In these cases it makes no sense to generate each type of field as a separate control. Far more convenient to insert information about specific fields in one type, hidden.
The idea of working control
Our control has to work as follows – while selecting a checkbox type field in the hidden field, we need to insert the ID of a specified category – such an ID will be separated by commas, which allows us to easily perform operations on the values of the hidden field (while removing category selection) and process the data with a native WordPress option in the PHP code.
Control code
Let’s start with the basic class structure of our control:
class Dziudek_Category_Checklist extends WP_Customize_Control {
public $type = 'dziudek_category_checklist';
public function __construct($manager, $id, $args = array()) {
parent::__construct($manager, $id, $args);
}
public function enqueue() {
wp_enqueue_script('dziudek-category-checklist', get_template_directory_uri() . '/inc/dziudek-category-checklist/dziudek-category-checklist.js' );
wp_enqueue_style('dziudek-category-checklist', get_template_directory_uri() . '/inc/dziudek-category-checklist/dziudek-category-checklist.css');
}
public function render_content() {
?>
<label>
<?php if(!empty($this->label)) : ?>
<span class="customize-control-title">
<?php echo esc_html( $this->label ); ?>
</span>
<?php endif; ?>
<?php if(!empty($this->description)) : ?>
<span class="description customize-control-description">
<?php echo $this->description ; ?>
</span>
<?php endif; ?>
<!— Space for the proper control code —>
</label>
<?php
}
}
[/php]
<p>This is the standard code that I described earlier. Something to bear in mind here is that I created the code under the Twenty Fourteen theme structure, so the JS and CSS files are in the <strong>inc</strong> directory.</p>
<p>On the other hand, the code generating the <strong>checkbox</strong> type fields looks as follows:</p>
<div class="dziudek-category-checklist">
<ul>
<?php wp_category_checklist(0, 0, explode(',', $this->value()), false, new Dziudek_TC_Walker_Category_Checklist($this->id), false); ?>
</ul>
<input type="hidden" id="<?php echo $this->id; ?>" class="dziudek-category-checklist-value" <?php $this->link(); ?> value="<?php echo sanitize_text_field( $this->value() ); ?>">
</div>
In the above code there’s a lot of information, so lets analyse it bit by bit:
- we generate a list of checkboxes with the native function wp_category_checklist (we can also generate an arbitrary taxonomy list with the use of wp_terms_checklist), which as a third argument accepts an ID list of selected categories separated by a comma; coincidence? ;)
- in the fifth argument, we overwrite the function which generates list elements with its own class, which I describe later
- at the end we create hidden fields, which will store the values of the control (for testing purposes, we can temporarily change its type totext) – of course, to personalize the screen to react to changes in the value of the option, we need to immediately call a method; $this->link().
It’s time to create the class that generates the list elements:
class Dziudek_TC_Walker_Category_Checklist extends Walker {
var $db_fields = array ('parent' => 'parent', 'id' => 'term_id');
var $field_name = '';
function __construct($field_name) {
$this->field_name = $field_name;
}
function start_lvl( &$output, $depth = 0, $args = array() ) {
$indent = str_repeat("\t", $depth);
$output .= "$indent<ul class='children'>\n";
}
function end_lvl( &$output, $depth = 0, $args = array() ) {
$indent = str_repeat("\t", $depth);
$output .= "$indent</ul>\n";
}
function start_el( &$output, $category, $depth = 0, $args = array(), $id = 0 ) {
extract($args);
$output .= "\n<li>" . '<label><input value="' . $category->term_id . '" type="checkbox" ' . checked(in_array($category->term_id, $selected_cats), true, false ) . disabled(empty($args['disabled']), false, false) . ' class="gk-category-checklist-checkbox" data-id="'.$this->field_name.'" data-category-id="'.$category->term_id.'" /> ' . esc_html( apply_filters('the_category', $category->name )) . '</label>';
}
function end_el( &$output, $category, $depth = 0, $args = array() ) {
$output .= "</li>\n";
}
}
In the above code there are two things that are very important:
- The $db_fields field, which allows you to specify taxonomy object fields that will be used to generate the structure of the list
- The start_el method, which is responsible for the structure of the list elements we are interested in
A couple of important elements of the start_el method:
value="'.$category->term_id.'"
The above fragment is responsible for setting the appropriate value of the field.
checked(in_array($category->term_id, $selected_cats), true, false)
In this fragment, the fields to be selected are generated on the basis of the user’s selections when generating the control structure.
data-id="'.$this->field_name.'" data-category-id="'.$category->term_id.'"
For later script needs I added the above attributes to better handle changes in the value field.
The CSS code of our control is not too extensive:
.dziudek-category-checklist {
    min-height: 42px;
    max-height: 200px;
    overflow: auto;
    padding: .9em;
    border: 1px solid #dfdfdf;
    background-color: #fdfdfd;
}
.dziudek-category-checklist .children {
    padding: 5px 0;
}
.dziudek-category-checklist .children li {
    padding-left: 20px;
}
The most important here is the max-height feature – it is crucial, as some of us may have lots of categories, thus, it prevents a very long list of interfering options in the layout personalization selection screen.
The JS code for our control is a little less extensive. Let’s start by adding an event handler for the checkbox type fields:
$(document).ready(function() {
    $('.gk-category-checklist-checkbox').each(function(i, checkbox) {
        checkbox = $(checkbox);

        checkbox.on('change', function(e) {
            e.stopPropagation();
            var id = $(this).attr('data-id');
            var category_id = $(this).attr('data-category-id');

            if(checkbox.prop('checked') == true ) {
                add_checked_category(category_id, id);
            } else {
                remove_checked_category(category_id, id);
            }
        });
    });
});
In the above code each control of the checkbox type has added support for change events, which is available when the control value changes. Two pieces of information are taken from the control – the name of the list, which is associated with the specific field as well as the category ID which is to be added or removed. On the basis of the control selection state, the ID of the category is added or deleted from the list in a hidden field.
Adding the category ID is done via the below function:
function add_checked_category(category, control) {
    var value = wp.customize.instance(control).get().split(',');
    value = value.filter(Number);

    if(value.indexOf(category) === -1) {
        value.push(category);
        wp.customize.instance(control).set(value.join());
    }
}
In contrast, the removal is performed by a function with the following form:
function remove_checked_category(category, control) {
    var value = wp.customize.instance(control).get();
    value = value.split(',');
    var category_index = value.indexOf(category);

    if(category_index >= 0) {
        value.splice(category_index, 1);
        value = value.join();
        wp.customize.instance(control).set( value);
    }
}
As we can see, both functions accept two arguments – for category ID as well as ID controls (hidden field that stores a list of ID-selected categories).
What’s important is that we do not directly modify the value of the hidden field itself; instead we use the API of the personalization screen with the wp.customize.instance() method, which automatically changes and takes the value of the hidden field.
Using our control
For our control to appear on the customization screen, we need to call it in the following way:
$wp_customize->add_setting('blog_categories', array(
	'default' => '',
        'sanitize_callback' => ‘dziudek_validate_category_checklist'
    ));

    $wp_customize->add_control(new Dziudek_Category_Checklist(
    $wp_customize,
    'blog_categories',
    array(
	'label' => 'Select categories',
        'section' => 'featured_content'
    )
));
The function to check the value of the options is as follows:
function dziudek_validate_category_checklist($input) {
    $temp = explode(',', $input);

    if(count($temp) === count(array_filter($temp, 'is_numeric'))) {
        return $input;
    }

    return null;
}
Our control should looks like this:
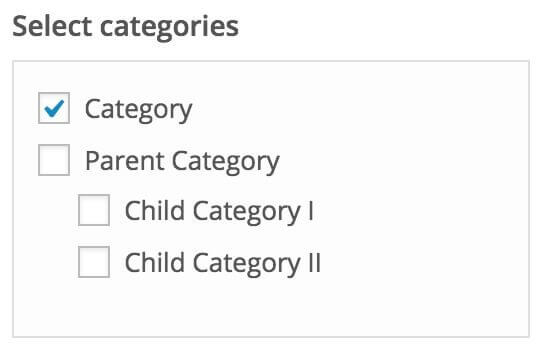
When it appears that everything is working fine …
… we run into a little problem. If we use the Firefox browser, then we’ll see that when choosing a category, something strange happens with the first checkbox – it selects and deselects itself while choosing other categories.
Unfortunately, so far I have not found the exact reason of the problem. All I know is that it is most likely a problem with the personalization screen script, because on a website without the JS code such behavior does not occur, and the problem occurs even without the addition of the JS code control.
Happily, I found a simple workaround – because it always selects/deselects the first field of checkbox type, we can just create an additional hidden field at the beginning of the list to “take the hit”, using the following type:
<li class="dziudek-fake-checkbox"><input type="checkbox" /></li>
And add the right CSS code, of course:
.dziudek-fake-checkbox {
    display: none;
}
Which solves the problem. If I find the reason for this issue, then I will of course update you on the blog.
What next?
The above control code can be easily adjusted to other needs – we may create a list which will allow you to specify different layout for each category by changing the checkbox type fields to select fields with a list of systems. In this situation, we would store the data in the ID1=layout,ID2=layout,ID3=layout.. format.
Summary
I strongly recommend your own experiments in this topic, because thanks to the described method of using hidden fields to store the values from other fields, you can create very interesting controls and significantly expand the capabilities of our theme, and increase user comfort.