The WordPress Theme Customizer’s screen shows its real potential when we’re looking to craft a completely new control – the customizer’s API allows us to create a dedicated control with it’s own appearance and behavior.

Bases
To create our first custom control, it is essential that we familiarize ourselves with some important elements of the API.
First of all, while creating our custom control, we’ll make use of the WP_Customize_Control class. When creating a child class of this we will have to override two or three methods:
- enqueue – responsible for adding supplementary CSS styles and JS scripts of our control
- render_content – this method is used to generate the HTML structure of our control
- to_json – a rarely overridden method, which is used to pass the appropriate parameters to the API available in JavaScript.
We can certainly create some of our own methods that use the overwritten methods detailed above in their code.
One of the WP_Customize_Control class fields which needs to be overridden is the type field – it is responsible for defining the type of control our new control is, and its default value is text.
Plan
For this example, our control will create a field where a user can choose a date, which can be used to define a deadline or other time period.
When would such a control be useful? It could, for example, be used when creating a theme to offer an option to change the style over a particular time frame, such as having a Christmas-themed version of the site that is only available in the holiday period.
Theoretically, we should be able to simply take advantage of the fact that WordPress 4.0 and beyond can create any control available in HTML5, but of course support for these controls is quite selective, which means that they are not suitable for applications where supporting multiple browsers is important; and for most users, reaching the optimal audience will be more important.
Hence, our control will consist of several elements:
- Effective HTML structure
- JavaScript, which will be responsible for handling the behavior of our control,
- CSS code, which will provide the styling for our control.
We’re not going to create a JavaScript calendar from scratch, as this would require an entire separate post to explain. Instead, we’ll use the Kalendae script.
Implementation
Let’s start by downloading the Kalendae script and replacing its files from the build catalogue with the tc-calendar catalogue.
Then, we should create a tc-calendar.php file and create it within the TC_Calendar_Control class:
class TC_Calendar_Control extends WP_Customize_Control {
    public $type = 'tc-calendar';
    public function __construct($manager, $id, $args = array()) {
         parent::__construct($manager, $id, $args);
    }
}
After this, we need to add the JSS and CSS files of our control, creating the enqueue method:
public function enqueue() {
        wp_enqueue_script('tc-calendar', get_template_directory_uri() . '/inc/tc-calendar/kalendae.standalone.js' );
        wp_enqueue_style('tc-calendar', get_template_directory_uri() . '/inc/tc-calendar/kalendae.css');
}
As you can see above, we use the kalendae.standalone.js file, as the library moment.js is not available in WordPress.
The last important method which we’ll definitely need to create is the render_content:
public function render_content() {
?>
<label>
<?php if(!empty($this->label)) : ?>
<span class="customize-control-title">
<?php echo esc_html( $this->label ); ?>
</span>
<?php endif; ?>
<?php if(!empty($this->description)) : ?>
<span class="description customize-control-description">
<?php echo $this->description ; ?>
</span>
<?php endif; ?>
<input type="text" class="auto-kal" <?php $this->link(); ?> value="<?php echo esc_attr($this->value()); ?>" />
</label>
<?php
}
[/php]
<p>In addition to checking whether there is a label and a description of our control we also have, as you'd expect, the code that creates the main part of our control; an input element with the <strong>auto-kal</strong> class. Thanks to this class the <strong>Kalendae</strong> script automatically detects fields in the date-selection field is added.</p>
<p>We have also two important methods called in the code, which come from the <strong>WP_Customize_Control</strong> class:</p>
<ul>
<li><strong>$this->link()</strong> - responsible for the registration of our control on the JavaScript API linked to the customization screen. Without it, the screen will not respond to changes in the value of our control and will be not available on the JavaScript level.</li>
<li><strong>$this->value()</strong> - using this method will store the value of our option in the interface after saving; if we don't use this, the option value will be saved the first time, but wiped blank the next time you save settings, unless the user notices the option value is empty and fills it again.</li>
</ul>
<h4>Small fix in CSS</h4>
<p>In the <strong>kalendae.css</strong> file, we need to increase the <strong>z-index</strong> value to <strong>1000000</strong> for this selector: <strong>.kalendae.k-floating</strong>, otherwise the calendar block will not appear - it will be found under the control structure.</p>
<h3>Our control is ready!</h3>
<p>As you can see, we did not need to work very hard to create our first quite complex control. Now, it is sufficient to create the code which will be used with this control.</p>
<p>In addition to joining our control code to the file that supports the customizer in our theme:</p>
require_once('tc-calendar/tc-calendar.php');
We also need to define the settings and new control:
$wp_customize->add_setting('theme_date', array(
        'default' => '',
        'sanitize_callback' => 'custom_sanitize_callback'
));
$wp_customize->add_control(
    new TC_Calendar_Control(
        $wp_customize,
        'theme_date',
        array(
            'label'   => __('Show posts since', 'theme_slug'),
            'section' => 'features'
        )
    )
);
The following control should appear:
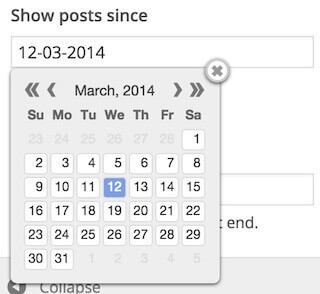
Additional custom control options
For dessert, I have a little supplement for you – the Kalendae script offers lots of configuration options. It’s worth including the ability to define at least some of the settings from the PHP level in our control.
As an example, I am going to add a date setting which allows one to define the date format used in the control.
At the end of the code that creates the control, an additional parameter should be added; format:
$wp_customize->add_control(
    new TC_Calendar_Control(
        $wp_customize,
        'theme_date',
        array(
            'label'   => __('Show posts since', 'theme_slug'),
            'section' => 'features',
            'format' => 'DD-MM-YYYY';
        )
    )
);
We add a $format field to our class that includes a default value for a new parameter:
public $format = 'DD-MM-YYYY';
However, in the render_content method, we also add the data-kal attribute, which defines the script configuration:
<input type="text" class="auto-kal" data-kal="format: '<?php echo $this->format; ?>'" <?php $this->link(); ?> value="<?php echo esc_attr($this->value()); ?>" />
Note! If we create a parameter whose name is used by WP_Customize_Control class (eg. id, manager itd.) then, we will not have an appropriate name for our parameter, as assigning the values of these fields is done after assigning fields based on an array of arguments control.
Basically, it would be the end in terms of adding additional parameters, if not for the fact that our parameters will not be available from the JavaScript level. That is why, we need to create our own implementation of the to_json method:
public function to_json() {
    parent::to_json();
    $this->json['format'] = $this->format;
}
Thanks to the above method, our option will be available in the JavaScript object of our control.
Summary
In a fairly simple way we managed to create quite a complex control with its own CSS and JS code. I strongly encourage you to experiment and explore the WP_Customize_Control class. In one of the next posts I will try to show you a few interesting elements that can enrich your custom control.