Jetpack. If you’ve used WordPress, you’ve probably heard the name at least once, or seen it on the add plugin page where it takes centre-stage even before a search, along with scary technical plugins that I won’t even try to use.
Point is, it’s quite a big deal. Many times I’ve seen users recommend Jetpack be installed as standard anytime you install WordPress simply because of the amount of features it adds. So, being still relatively inexperienced with WordPress, I thought I’d give it a blind install and see if there’s anything a beginner blogger such as myself might find useful, or if the features it has are just too much to deal with.
That sinking feeling
When I was a kid I’d have to do chores before I could go out to play during school holidays. There’s not much that can crush the spirit out of a kid like coming downstairs intending to blitz the dishes and head out to spend the day in the sun playing football, only to find that your older brother decided to have midnight snacks and has left a mountain of dishes and pans with burnt-in fat and stains that take a morning of hard scrubbing to clear up.
That feeling I got when I entered the kitchen and saw the sheer number of dishes waiting for me is pretty similar to how I felt the moment I installed Jetpack. Not in a bad way; it’s not like Jetpack is stopping me spending a day in the sun, but the feeling that I’ve bit off more than I can chew is certainly there. I mean, I heard it had plenty of features, but I wasn’t expecting to find 34 of the things when I decided to give it a test!
Oh well, I’ve made my bed, so I guess I’ve got to sleep in it and try out every one of those features to see if it’s something a slightly-above useless beginner can benefit from. So let’s not stand on ceremony; I’ll jump in straight away with Site Icon
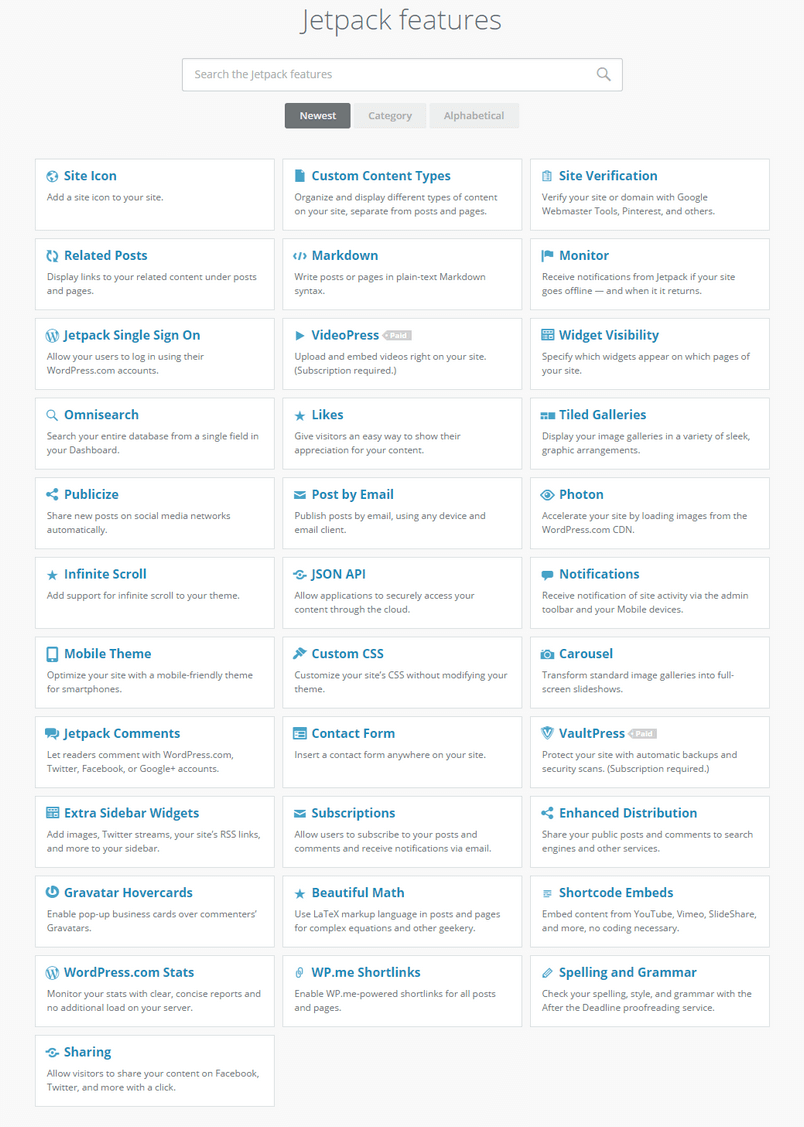
Site Icon
Alright, so the list of features is pretty daunting, but I was fairly sure that Site Icon wasn’t going to be rocket science. And what do you know, it isn’t! This feature lets you set an icon that will then be used as the favicon (the little icon that appears to the left of the tab title when you visit a website), mobile icon, or tile icon if you’re on Windows 8.
Actually implementing it caused a bit of confusion for me. Clicking on the feature on the Jetpack main screen opens a useful overlay that tells me to open the Settings>General>Site Icon option to add my favicon. What it doesn’t mention is that I need to activate the module first.
I ended up trying to find a Settings>General section in the Jetpack settings, but it doesn’t exist; there’s just a list of modules. Turns out, after clicking on the Site Icon module to open the description I then need to click Activate, and then the favicon option will appear in the settings area for WordPress, not Jetpack. The reason I missed it is something I’ve found happens to me quite often; I’m working on a large 27" screen at 2560×1440 resolution. The Activate button is small, approx 75×25 pixels hidden away at the bottom right of the description overlay that opens when a feature is clicked. As such, there is a huge amount of whitespace between the description and the button that makes it hard to notice without me specifically looking for it.
Still, once I’ve activated the module the button changes to a Configure button that instantly takes me to the settings area, so now I’ve figured it out it’s not so bad. Adding the icon; now that’s a lesson in intuitive, user-friendly design.
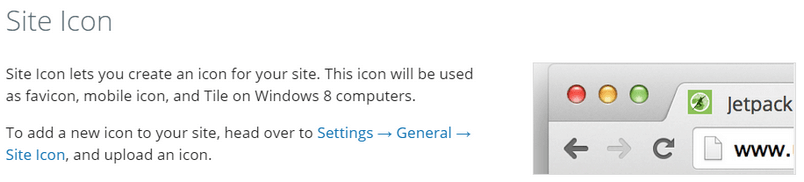
After picking an image to upload there’s a screen where you can crop the image to your liking, with a live preview of how it will look as a favicon and mobile icon. It’s so simple, but many developers miss out these kind of visual clues, and kudos must be given to Automattic for making things so clear.
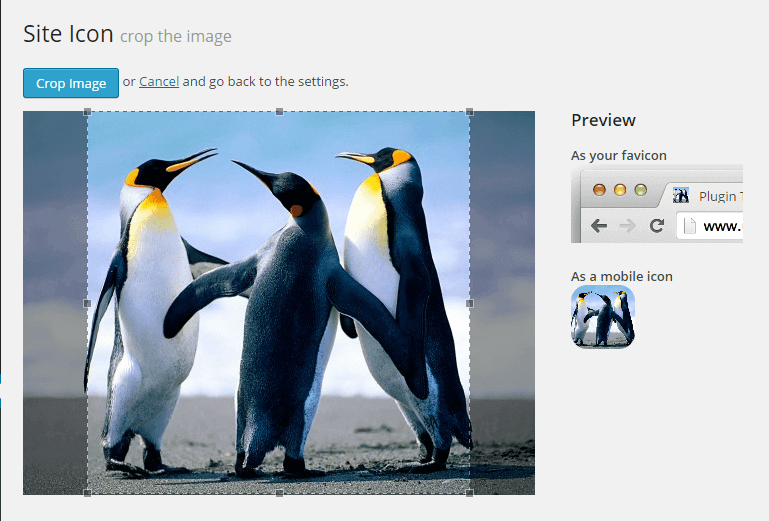
Custom Content Types
I’m really starting to appreciate the pop-up description box that appears when a feature is clicked; so many plugins I’ve tested forget that some people are completely useless at technical stuff and won’t automatically know where settings will be and what they’ll do, so this is really helpful.
The description tells me that this module will add a new portfolio content type separate from posts and pages, so let’s see what it’s like. After activation a new menu item for Portfolios appears on the left bar. Inside is essentially the same creation tools as with a post; you can create categories and tags to sort your work, and add text and images. Portfolio projects have their own archive page too.
It seems the main use for these projects is twofold; first, some themes include a specific page template for portfolio pages that makes them more effective for displaying projects, and projects can be inserted into posts and pages via a shortcode, with multiple display options that let you highlight multiple projects in the post. Maybe not something a general blogger would need, still a useful way to further compartmentalize your content into specific sets.
Site Verification
The description doesn’t give me much for this one; just says that it helps you verify your website with external services, specifically mentioning Google, Bing and Pinterest. This option automatically takes care of adding the meta information required for getting access to web analytics; once activated it’s all done automatically, so you can just go to whichever site you wish to verify your site on and get started. This isn’t something I’d imagine a casual blogger would need early on, but if you’re intending to grow your audience then accessing analytics can be a very effective way of diagnosing your site strengths and weaknesses.
Related Posts
The name of this should give something away! If you wander most any WordPress site, you’ll notice that underneath all the text and images of the post is a section dedicated to encouraging readers to click on through more of your posts, the idea being that they are similar in concept to the current post being read. Doesn’t necessarily work that way, but it’s a pretty useful feature for the newcomer all the same.
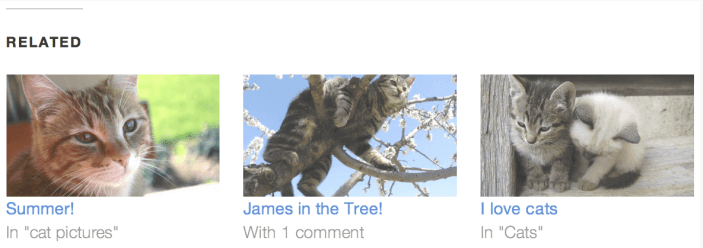
It’s designed to be mostly hands-off though; you can decide whether to use plain text or include images in your previews, but the size of the images and the crop for the featured image used as the preview are automatic, as are the post selections (these are arranged by WordPress based on keywords, tags, categories et al) so you won’t be able to fine-tune things to your needs. If you’re focusing entirely on writing without distraction, then this module is an efficient way to encourage more clicks with virtually no work involved whatsoever. However, if you’re serious about growing your audience then a third-party plugin would probably work better to advertise your posts; our News Show Pro widget for example, is one of many article-preview options out there if you want a slicker, more flexible post showcase.
Markdown
If you’re not familiar with Markdown, you can think of it as shorthand HTML; instead of manually opening and closing tags, adding punctuation etc…you can instead use some simple formatting to write faster and more accurately, without any pesky HTML tags getting left open (the bane of my life!).
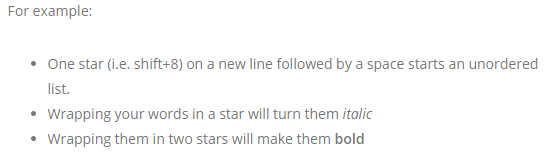
For example:
- One star (i.e. shift+8) on a new line followed by a space starts an unordered list.
- Wrapping your words in a star will turn them italic
- Wrapping them in two stars will make them bold
Take a look at how the above rules look when written in markdown in the text editor:

And how it will appear on the actual site:
It doesn’t end there; Markdown can be used to add things like code tags, ordered lists, h1-h6 tags and more, all using basic symbols.
Personally, I love markdown and write all my posts in it, but I think this is because I work for a web developer, so I have an interest in gaining at least a bit of understanding of HTML/CSS beyond the basics. If you’re running a blog, then you’re probably just going to use the basic WordPress editor, though if you tend to write your article first locally and then copy/paste to your blog, markdown can be a good way of keeping the HTML simple; in the past when I’ve tried copy-pasting something I’ve written in a text editor to the WYSIWYG editor it ends up with insane HTML formatting that makes my eyes bleed.
The thing is, even in that case you’re not likely to write in markdown directly in the plain text editor in WordPress; you’ll write it locally with MarkdownPad or whatever markdown editor works for you, then copy it as HTML to your blog. There’s going to be exceptions of course, so if you think you’ll find this feature useful by all means activate the module, but I don’t think the average beginner will need it.
Monitor
A simple but useful module that checks your site every 5 minutes and sends you an email if your site goes down, either down to your host having issues or you not paying the bills and getting the lights cut off. It also drops an email when your site comes back up, so you’re always informed.
There’s really no reason not to use this if you’ve got Jetpack installed; even if there’s nothing you can do when your site is down you can still track your site’s total downtime, which is invaluable if you need to give your host a call.
Single Sign On
This is one of those modules that I’m not sure a beginner will have any use for. When activated, people who visit your site will be able to sign-in using their WordPress.com account credentials. However, generally-speaking things like Facebook/Twitter et al are far more popular choices for simplifying the login process, and from a purely statistical point of view someone who comes to your site is far more likely to have a Facebook account than they are a WordPress.com one.
Saying that, I imagine that there are situations where a site may benefit from such a function; if you’ve previously built your audience via a WordPress.com blog then offering a simplified WordPress.com login could be useful to maintain that audience’s participation. Then again, with the rise of useful third-party comment systems like Disqus, one has to wonder how necessary a separate login for a small blog or other beginner site really is; most people will just want to comment, and Disqus offers multiple login options that transcend singular websites; it’s just more convenient.
VideoPress
This is a big one, with a functionality that any serious video-focused blog will want to look at. Once activated, you can add videos to your site that don’t use ads, a massive 1GB video size limit (with no length restrictions) and flexibility to upload videos direct from your phone, with plenty of extension support.
However, all this comes at a price; $60 per year. It’s not much considering you get ad-free videos that can really make a difference to your site, but the cost is there, and it’s likely not one a beginner blogger is going to be willing to take on.
There’s another issue too, which may be something exclusive to me, but I feel that it’s worth considering. If you’re a frequent video poster, though using a third-party service like Youtube has many annoyances and includes ads for your viewers, one can’t deny the sheer potential audience it offers. If your videos are hosted entirely on your blog, you need the SEO, content and popularity to bring people to your site before they even see them. With Youtube, you have a potential audience of millions right there on the site, which can just as easily bolster your blog viewing figures as vice-versa. People like to explore, but they often return to what is familiar, so maintaining a presence across several sites (Facebook, Youtube, Twitter) provides more opportunities for you to connect.
Despite this, if you’re a professional who needs videos to highlight your brand or empower your other site content, then VideoPress may be a worthwhile investment; when you’re trying to project a professional company image the last thing you need is a random ad popping up when users want to see your company introductory video!
That’s all for now!
You might have read through the above thinking "wow, Jetpack offers a lot of features", but I’ve only just scratched the surface of the 34 modules included in the install. Join me next time as I continue wading through more features to see if there are any gems that a beginner just can’t do without!