Ask anybody to name something about WordPress or Joomla!, and there’s a good chance that they’ll mention widgets or modules; they often provide a key part of a website’s overall content so it’s rare to find anything but barebones sites that don’t use any. In this part of our series comparing Joomla! and WordPress, we’ll have a look at the basic functionality these elements provide, and how WordPress and Joomla! differ in their approaches to displaying their content.
Creating Content
Though they are not exact matches, Joomla! modules and WordPress widgets are roughly equivalent in terms of their function; generally-speaking, they are extensions that are responsible for generating a fragment of a given page or subpage. The content could be very simple, merely displaying a block of HTML code, or more complex, such as when our News Show Pro module/widget pulls data from posts or articles to generate previews containing headings, text fragments and showcase images or thumbnails.
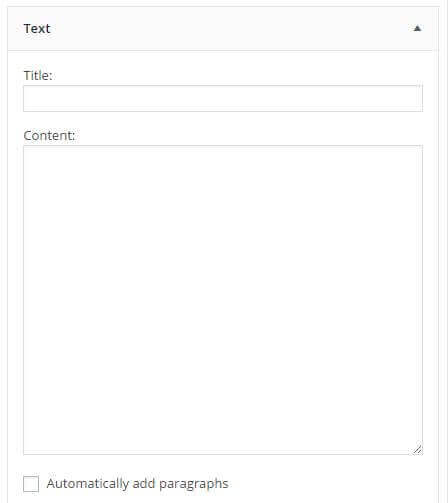
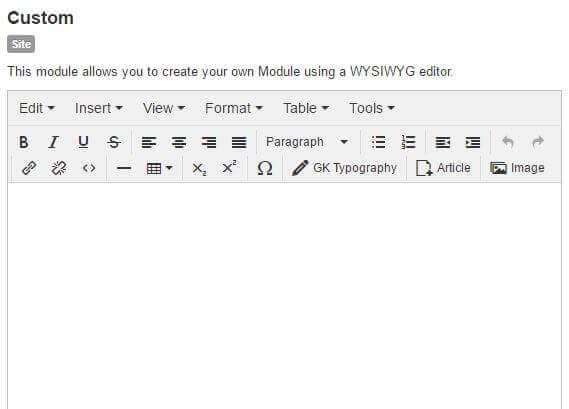
Both of these extension types will include a number of options allowing for the module or widget’s content to be defined and manipulated; at its most simple is the Text Widget or the Joomla! equivalent, the Custom HTML Module. The options in both types allow for the creation of a title plus plain text/HTML code which can then be manipulated via CSS like any other piece of content:
Displaying modules and widgets
Of course, creating the content fragment is only the first step; we’ll also want to display the module or widget on the site. To do this we need to use a separate mechanic, called Module Positions in Joomla! and Widget Areas in WordPress. These positions are not a default part of their respective CMS; instead, the available positions are defined within the theme or template used by the site.
WordPress Widget Areas
Given the blog origins of WordPress, widget areas were originally created for the purpose of allowing the addition of information to a website’s Sidebars; that is, a content area that is separate from the main content of the page. A simple example can be found by looking to the right of this article; you’ll see a search bar plus social media and blog category links. This sidebar of information will appear on every blog post page providing alternative functions that can be useful, but do not directly affect the main page content.
As WordPress has grown the scope of widgets has also grown with it, and now many themes will boast a number of widget areas far beyond the standard sidebar; our recent TechNews theme included four widget areas in the footer (they were used to generate the lower parts of the frontpage content) as well as the standard sidebar area. In more complex themes, depending on how they are built, you may find many more widget areas, but the number added is always at the discretion of the theme developer who must add the relevant code to their theme to insert each area, though of course an experienced user can do this themselves.
Joomla! Module Positions
Module positions in Joomla! are functionally the same as WordPress; the usable module position names and locations are defined within the template’s code, and thus depend on the template developer actively adding these areas, or the end user adding them on their own accord. However, unlike WordPress, Joomla’s origins were not focused on blogging, but in general website management; this meant that many templates are not blogging-specific and include a larger number of module positions as a result.
A simple way to exhibit this difference in approach is to look at the default templates included with Joomla! and WordPress respectively. The current WordPress Twenty-Fifteen theme that is included with all new installs includes a single widget area; a sidebar on the left side of the main content. Beez3, the default template included with Joomla! (and originally released in 2009; an age ago in web-design-time) includes more than ten module positions covering most areas around the main content, including footer areas, sidebars on both sides of the content, and top areas above the main content.
Assigning WordPress Widgets
Assigning of widgets in the WordPress dashboard is possible in two areas of the Appearance section; the WordPress Customizer, and the Widgets screen. The Widgets section is the main area for adding widgets to a WordPress page; available widget types are listed on the left-hand side of the page, with the available widget areas as defined by the theme listed on the right. To add widgets, users can expand the widget area they wish to add the widget to, then drag and drop an instance of the chosen widget from the list on the left to the widget area.
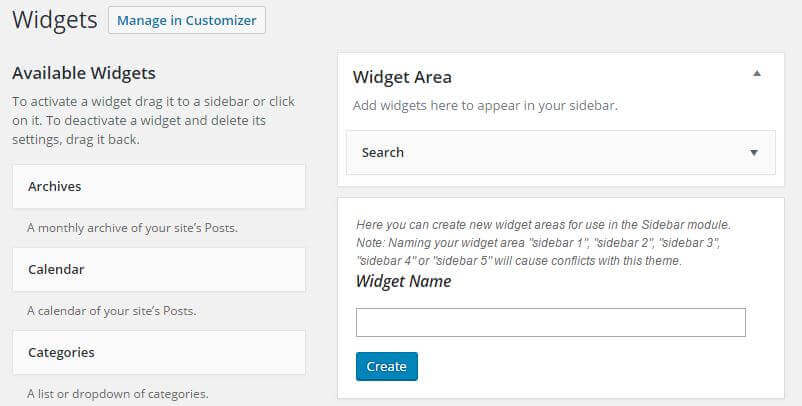
Once a widget has been added, its options panel will automatically expand so additional settings can be configured; for simple widgets this might mean just a title field, but more complex widgets (such as our News Show Pro widget) can have multiple sub-sections covering a wide range of options. Widgets added to a widget area will be displayed on the page in the order that they are listed, so the first widget in a sidebar will appear at the top of the sidebar on the live page, the second widget underneath that etc…Widgets can be dragged and dropped within the widget area to redefine the display order. Widgets can be removed from a widget area by dragging and dropping the widget from the widget area into empty screen space, or can be saved with their configuration intact by dropping them into the Inactive Widgets section at the bottom of the page.
The second method for adding widgets is via the Customizer, found in the Appearance → Customize area of the dashboard. Here, adding widgets is less intuitive since there is no drag & drop function, however since the Customizer provides a live preview of changes it’s possible to see the effect each widget and setting has on the live site. Note that not all widget types can be live previewed or even added/updated via the customizer; more complex widgets are especially prone to this.
Assigning Joomla! Modules
Adding modules to module positions is controlled via a Modules section of the Joomla! administrator area, and if you’ve been following along with previous entries in this series then you should already know what to expect; a more flexible system that’s a lot less intuitive. Unlike WordPress, Joomla! does not list available module positions and display widgets according to the position they are assigned to; instead, all modules are listed alphabetically by module position. This system makes it irritating to locate individual modules if you are not familiar with the module position layout, but to mitigate this issue there are robust filter options, so you can display modules from a particular module position, those assigned to a particular page, published or unpublished, access levels and more. It’s a system with expandability in mind; irritating when dealing with a small number of modules, but less frustrating compared to WordPress when dealing with a large site with a large number of modules.
To assign a module in Joomla! it must be created first, and assigned to a position during the creation process. Clicking the New button on the module screen opens a list of available module types:

Once a module is selected, the new module is created and its options screen opened:
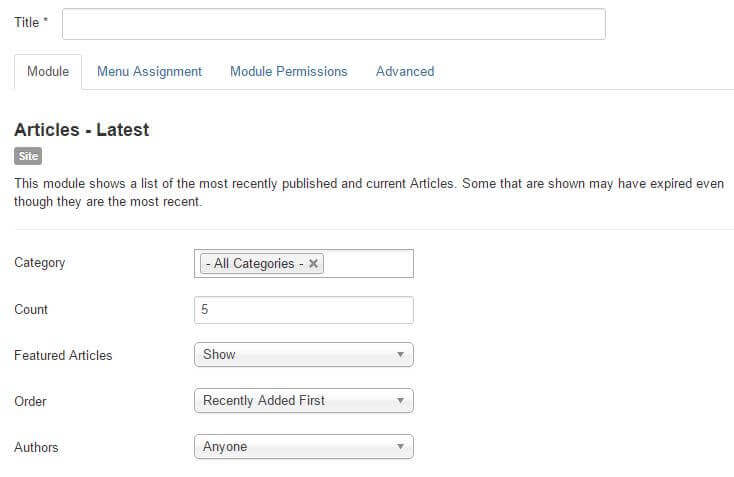
Unlike WordPress, all the module’s settings are taken care of in a separate screen from the module list, making it slightly harder to compare two modules’ settings since you’ll need to open two separate pages, rather than expanding the options on the same screen. The available options for modules provides one of the most significant areas where Joomla! differs from WordPress, which we’ll look at in the next section. The module position that the module should be displayed in is set in this section via a drop-down list. Modules cannot be previewed as in the WordPress customizer; the module must first be changed or published, and then the live frontend checked to see the effects.
Module options: the Joomla! divide
During this series the key concept we have repeatedly returned to is that WordPress is meant to be convenient and intuitive for new users out of the box, with the potential for growth in functionality via the use of plugins. Joomla! on the other hand, is aimed at being a flexible solution straight after install. Of all the elements included in these CMSs, the differences between widgets and modules is where this difference in approach is most apparent.
Joomla! includes several core settings for every module that greatly improves their flexibility, the main ones being:
- Menu Assignment – Modules can be assigned by menu item, meaning that each page can use different modules to create its layout. This is seen often in GavickPro templates, where the front page will have unique modules assigned to create a unique layout, which is not replicated in other areas of the site. Modules can be limited to a single item, to all items, and anything in between.
- Publication Date – Like other content areas of Joomla!, modules may be scheduled to be automatically published or unpublished at a certain date a time.
- Module Class Suffix – This option allows every module to be assigned an individual class, which can then be used to target the module specifically in CSS for styling purposes.
- Modules in Content – Joomla! includes the ability to insert any module instance into page or article content using the loadmodule code, with buttons included in the TinyMCE editor to handle selecting and inserting the module.
- Module and Header tags – The HTML tag used to wrap the module and title on the live page can be set within the module options for greater CSS flexibility.
- Module Permissions – Modules can be set to be only visible to particular user groups, so different modules can be displayed to registered vs. unregistered users etc…
- Show or Hide Title – The title of the module can be set to not display on the live site.
- Duplicate Modules – Each created module can be duplicated along with its settings, speeding up workflow when creating multiple versions of a module (such as for registered users).
With WordPress widgets, there is only one basic option that is included for every widget by default; the Title where you can name widgets to distinguish them from other widget instances. Beyond that, it is up to the widget developer or additional plugins to expand the number of available settings. WordPress instead relies on its extensive plugin repository to provide these functionalities, keeping the core product simpler. The core functions included with Joomla! can certainly be replicated, and there are a number of simple plugins that will allow for widgets to be limited to particular pages, hide titles, insert widgets into post or page content or set publication dates and times, but these may be optionally added later rather than included in the core install.
In Summary
Few areas of WordPress and Joomla! highlight their different design philosophies more than the included widget/module functionalities they come with. The standard WordPress install includes a simple, easy-to-understand interface that even relatively unskilled users can navigate and set-up to their liking, with clearly-defined widget areas that are easy to comprehend at a glance and see what widgets are activated where. Once users are more comfortable with the system, they may then install a varied set of plugins which increase the functionality and complexity of the widget settings. However, the cost of this convenience is highlighted once more widgets are placed; the separated widget areas are not well-suited for managing large numbers of widgets, and with no filtering options the issue grows the more widgets are added.
Joomla! overcomes this by providing many options for narrowing the number of modules listed, allowing for groups of modules to be sorted by type, location and more which is immensely helpful when applying changes to multiple instances. It also comes equipped with a number of quality-of-life settings that are invaluable for most users, such as menu assignment options, class suffixes and the ability to insert modules into content, but in turn the sheer range of options available alongside the slightly unintuitive layout makes it a challenge for beginners to find their feet compared to WordPress’ less-overwhelming approach.